Residential Comfort & Energy EfficiencyMonday, April 12 2021
If you are always asking yourself, your spouse, your brother, a friend or just about anyone that will listen... Why is my energy bill so high all of the time? Then read this short article for key insights and actionable ways to fix your issue. Three Dimensional ThinkingFirst, to make a house energy efficient you've got to tighten your building's shell and usually the first thing that comes to mind for most people is windows and doors. But, residential energy consultants know there are many other places that need attention due to physics and pressure inside your home, especially at the top and the bottom. Have you ever noticed at one time or another that a door inside your house is particularly hard to open or that suddenly it slammed shut when otherwise on any other day, it would simply close behind you? The takeaway is that there are pressure dynamics going on inside your home and sometimes it is noticeable and other times you have no idea. So, don't overlook this when asking yourself about your energy bill and use this article to begin the "hunt" for the places that can easily be fixed. Once discovered, you will have more control over your comfort and the energy bill. One great cost-effective example that the majority of homes have is some type of attic access panel. In most cases, these areas are not insulated or sealed properly and they will greatly reduce the overall R-value of the rest of your insulation. Click to watch treatment to the hatch for ideas about how you can do it at home. Getting Control of Your Home's "Breathing"How many times have you heard somebody say "a house needs to breathe"? The "breathing" is the start of your problem. Yes, we want our homes to "breathe", but we must consider uncontrolled breathing compared to controlled breathing. Uncontrolled air leakage occurs when air moves through gaps or openings in walls, floors, ceilings, duct work, doors or windows to the outside and is often a major source of energy loss in homes. Another way to look at this is by considering how we behave on cold winter days. Most people jump out of their skin when they realize a window was left open and most people will close it right away. Consider this: What if all of the holes and gaps around your house are equivalent to three open windows? What if you could seal enough of those areas to close two of them? This would mean that you have a lot less energy loss and you can still breath! In today's technologically advanced world, it is not difficult to figure out how much air a house exchanges with the outside on an hourly basis with just a few measurements and blower door test so that properly controlled ventilation can be added if a house gets too tight.
|
|
Table of Contents 1. Signs You Need Attic Air Sealing 2. Why is Attic Air Sealing Important? 5. Air Sealing Electrical Hole - WATCH 6. Air Sealing a Bath Fan - WATCH |
If you want to know if you should air seal your attic, then you can ask yourself a few basic questions and quickly arrive at the answer.
The easiest way to know is to determine if you have air sealing in your attic now. If not, then you definitely need air sealing.
If you are not sure whether your attic is air sealed (who really wants to get in their attic?) then there are several things you can look for around the house that will tip you off.
Tell Tale Signs You Need Air Sealing in Your Attic
The first tell tale sign is spider webs. If you see spider webs dangling in recessed lights, near corners around mouldings in the ceiling or near the attic hatch, then you likely need to air seal your attic.
If you are feeling drafts around your home and different rooms seem more comfortable then others, particularly on extreme weather days, then you likely need air sealing in your attic and around other key areas of your home.
So, what is air sealing anyways? Let's figure it out...
Reasons Air Sealing is Important
You don't have to be a home builder to know a little about how a house is made. There certainly is no disputing that older homes, in particular, are not completely air tight. We are able to breath when we are inside, after all.
So why is it important to seal up your house? You need air to breath so what is the end game?
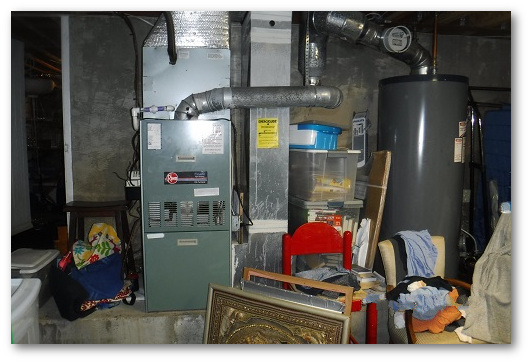
The biggest source of energy usage in a household bill is directly related to HVAC. The less your HVAC runs, the lower your bill. Pretty much that simple!
But, if your lucky, during extreme temperature days, your HVAC will actually catch up for a few minutes.
So, the idea when it comes to air sealing, is to prevent the air from flowing through those cracks in your building's shell, thus keeping it inside your envelope and keeping your home temperature more evenly controlled and comfortable.
Without effective air sealing in the attic, the R-value of your attic insulation actually suffers and that only adds to your woes.
Envelope Air Leakage Variables
A super interesting physics concept should not be missed when it comes to air leakage in a house. Without some force, air will not simply flow through a crack or gap. Loss of energy through any imperfect connection point is dependent upon the following factors:
- Weather Dynamic Pressure**
- Size of Crack
- Shape of Crack
- Location of Unwanted Connection Point
- Material where the Weakness is Occurring
**Pressure related to weather also illustrates why on a severely cold day, for example, that it becomes difficult to regulate temperature and keep a modest energy bill.
There are two factors at play.
1. The weather outside creates a greater pressure inside, particularly when the gap between the two temperatures is very high (25 degrees outside/ 70 degrees inside). Greater pressure acts to push your conditioned air through the cracks faster.
2. It is cold outside so the HVAC is running and the additional pressure created by the air flowing actually works to push the air through those cracks simultaneously while trying to heat or cool a room to the desired temperature, effectively creating a conveyor belt of conditioned air being delivered to places that nobody in the family is hanging out (outside).
Making matters worse, of course, is the fact that all the while that is happening, fresh cold air is being drawn in from other cracks in lower portions of your home.
Typical Leakage Point in Basement
In summer the pressure in an attic due to heat forces air through the cracks and as a basic and general rule, hot follows cold. So, in winter the warm air gets pushed up into the attic and in summer the hot attic air gets transferred down to wreak havoc on your AC unit and bills.
How to Air Seal
The general idea of sealing up a house is rather simple from 30,000 feet up.
But, it can be kind of tricky when you are up in the attic and different ways the house is assembled creates unique air sealing opportunities. Sometimes different situations call for different solutions.
Common air sealing materials include:
- Caulk or foam
- Sheathing tape
- Sheet metal
- 1/2" Polyiso (Rigid Foam Board)
- 3/4" Plywood
- 1/2" Drywall
A noteworthy takeaway from the list is that many common building components are listed as air barriers. The key is sealing up the gaps!
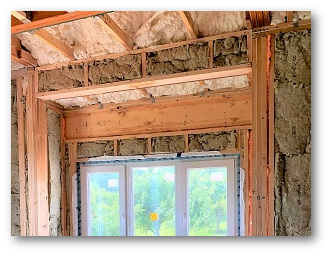
Take a look at this new construction wall/framing assembly and the attention to detail that is given these days in some instances to sealing up a home.
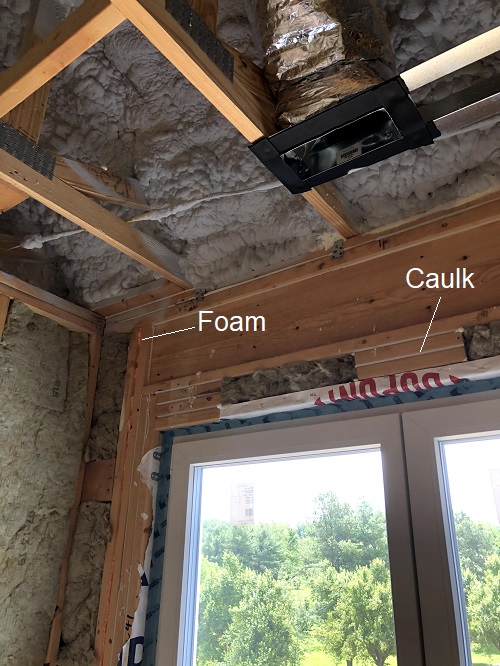
Obviously, unless we are doing a complete remodel, this is not practical for finished areas in preexisting houses. But, it does demonstrate the ways in which a home can leak and how to seal around any areas that are unfinished.
In a retrofit air sealing project, most of the "juicy" spots to seal are in the attic and basement.
The video below shows a skilled technician air sealing the tops of walls (top plates), light fixtures and electrical wiring holes that were drilled when the house was built. These are all places that air is traveling through, effectively escaping the inside if your "envelope" and costing you comfort and money.
The insulation is missing at the attic floor in the video and air sealing can be done when insulation exists as well.
-Back to Top-
Air Sealing Top Plates and Electrical Penetrations
When watching air sealing taking place it starts to make a lot more sense. Of course, there is no way to actually see the air flowing through these tiny gaps in real time, but what does happen over time when there is insulation in place is that the air flows through and around around the insulation leaving dust and dirt in its track.
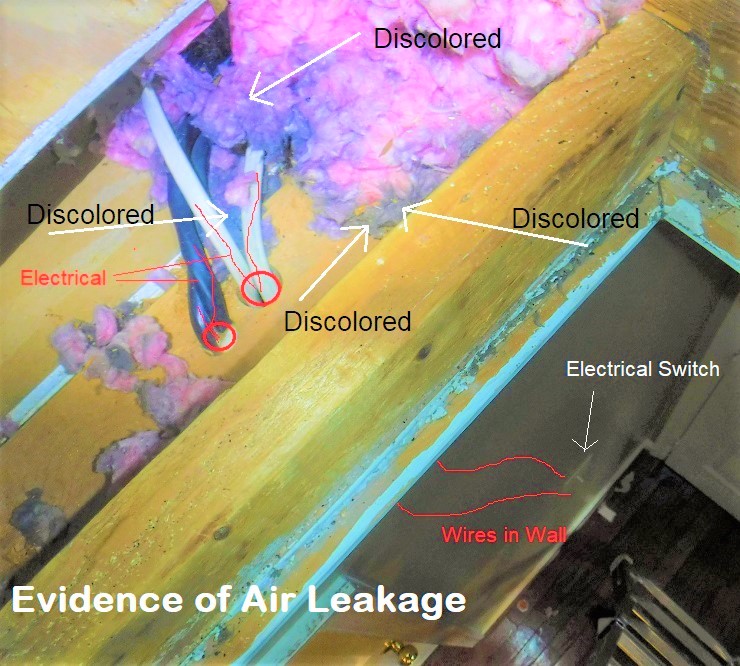
In the photo above taken at the top of the hallway push up attic access hatch is a great illustration of a few things.
First, you will notice the electrical wires that are running through the top of the wall above. The wires feed the hallway switch seen down below.
The insulation around where the electrical wires are fed is discolored telling the story that is all too common in homes that are not air sealed. Air is moving through those holes on the regular and air carries dirt and dust. Over time it adheres to the insulation which proves this important point.
Add all those holes up around your home and you have a nice big gap that can easily be the equivalent of having an open window in your home all year long. Having the attic unsealed is actually worse than having a window open because of the pressure being the most at the ceiling pushing through more air leakage as a result.
Besides electrical penetrations, there are many other areas in the attic that should be air sealed. More examples include:
- HVAC Chimney Penetrations
- HVAC Duct Penetrations
- The Attic Access Panel (pull-down stairs/ push-up hatch)
- Thermal Bypasses Due to Bulk Heads
- Knee Walls
- Recessed Lights
- Bathroom Fans
- Plumbing Vent Stacks
- Chimneys
- Electrical Box Bypasses
-Back to Top-
Air Sealing Bathroom Exhaust Fans
Have you ever been in the bathroom on a cold day and wonder why it feels so cold in that area despite it being more comfortable in the adjacent room or hallway? Sealing exhaust fans is an important nuance when it comes to attic insulation and they need special attention, particularly if you are experiencing temperature variance in rooms that they exist.
How to Measure Air Sealing Results
While listening to a podcast recently, I was struck by something that one of the hosts of the show said. Essentially, the saying goes something like this:
A measured project is a managed project.
There is nothing more true than this statement when it comes to air sealing an attic. One of the most difficult things to do is check on the work once the attic is insulated. Moving insulation around once a project is "completed" is grounds for decreasing the overall effectiveness of the work that was done. That is obviously counter-productive.
If you are doing this project on your own then the dynamics change and what I am about to say is not nearly as critical.
But, if you need to hire a professional, you should make sure that the company is going to perform a blower door test or air leakage test - before the work is done and after. This way, you can measure the results of sealing up the cracks.
The blower door measures the house's "leakiness". So, getting a flow number after can be compared to the initial number and results can be taken away in the form of a before/after.
The best way to have this done is to get a home energy audit if you have that available in your area. In Maryland, the local utility companies work within the Home Performance with ENERGY STAR parameters and it is a great program for the residents of the state.
Watch this blower door test example and what we did to get the right results!
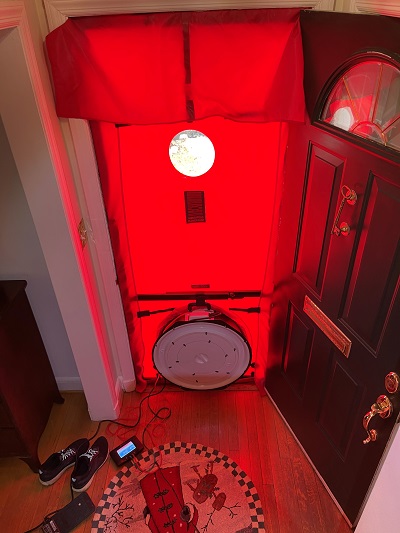
The test works by pulling all of the air out of your house and as each little bit of air leaves it is immediately replaced by air from the outside of the "envelope", thus creating a flow at the fan that is measured in cubic feet per minute (CFM).
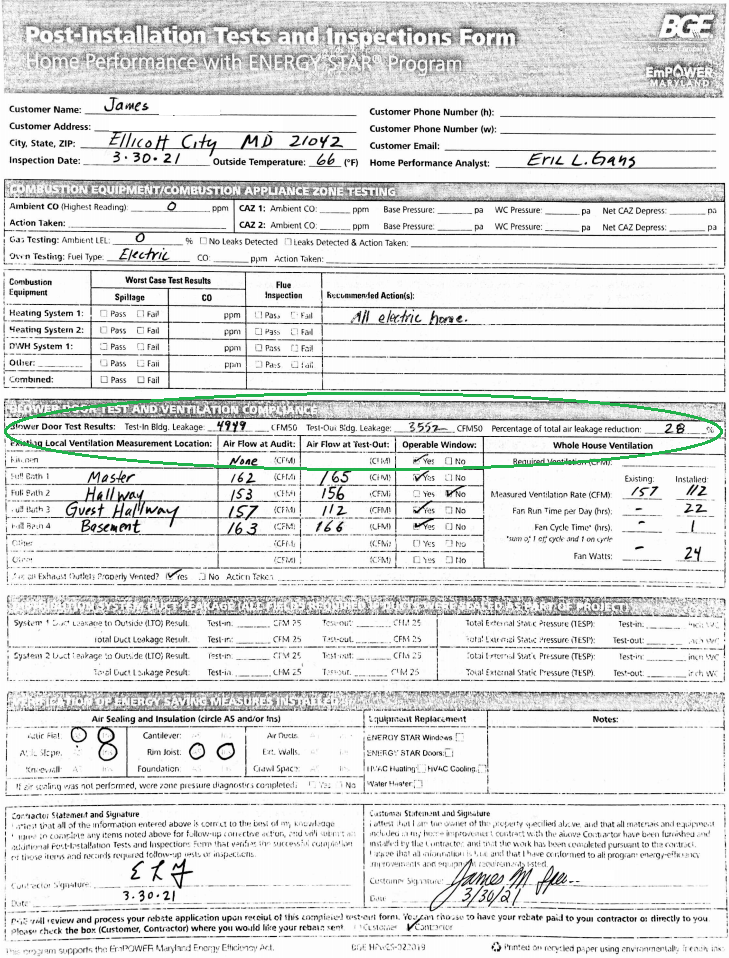
Here is another example of results with photos showing before the work and after with the accompanying signed test-out result form.

|
Air Flow at Test-In = 4949 Cubic Feet Per Minute After Air Sealing Air Flow at Test-Out = 3552 Cubic Feet Per Minute 28% Reduction |
The actual result sign off sheet for the homeowner.
Health & Safety Matters to Consider when Air Sealing
Two building science principles every homeowner should know
- Air Changes per Hour
- Indoor Air Quality
Air Changes Per Hour (ACH)
Air changes per hour (ACH) can be defined as the amount of times the volume of air inside your home changes with the outside air. It is the house "breathing" in effect. If your house is calculated at 7 ACH then you can expect that on any given day and during any given hour, the inside air will exchange with outside air seven times.
ACH in new construction homes has to be very low (3 or less). New building codes for energy efficiency are making builders install energy efficient measures at the time of construction so that all of the typical leakage points are sealed before walls and ceilings go up which makes those areas very difficult to treat after they are in place (like in preexisting homes).
Controlled vs. Uncontrolled Fresh Air
But, when we tighten up the envelope and don't allow the house to "breathe" as much we have to find solutions to create the right amount of ACH for healthy indoor air quality. The key to this is to make sure the introduction of fresh air into the building is controlled so that less energy is consumed to maintain good indoor air quality (the right amount of fresh air) rather than allowing it to infiltrate uncontrolled causing heating and cooling systems to work much, much harder.
Indoor Air Quality - What is it Actually?
So in considering indoor air quality, it is important to know that measuring indoor air quality is NOT to measure the amount of particles in the air. Indoor air quality is actually making sure that a building has enough fresh air and in a manner that is cost-effective. Good indoor air quality also goes a long way towards sustainability and the longevity of the buildings structural components.
Combustion Safety
A home environment is subject to many different dynamics including pressure. Pressure inside a home varies from house to house, neighborhood to neighborhood. When a combustion appliance, such as a hot water heater or furnace is running, the conditions in the house could change the way the appliance runs. If the change is too much for the system, it could cause a hazardous situation inside the home to unsuspecting inhabitants.
Combustion safety testing for gas fueled houses is a key to a safely air sealing a home. Much like the blower door test where the air leakage is recorded before any changes and after, the appliances are tested prior to any work being done. Once the work is completed, the testing is conducted again to see if the resulting "tightening of the envelope" creates any spillage or adverse conditions inside the home.
Get Your Scores Today! - Home Energy Audit
A comprehensive home energy audit is a great way to have your home evaluated. Measures can be prescribed in a way that will address indoor air quality as well as energy efficiency and comfort. It is the whole house approach that ensures that you can have the best indoor air quality and a less drafty house at the same time.
-Back to Top-
________________
What do you think about air sealing your house? We want to hear in the comment section below!
There are literally thousands of homeowners in Maryland that are a lot closer to having a more comfortable home than they ever could have imagined.
Let me explain...
In March 2021 I did a BGE energy audit in Howard County for a really nice family that just moved back to Maryland from a warmer part of the country around the end of summer 2020.
They reported to me that their first winter here was brutal.
Cold spots at every turn, drafts in areas they enjoyed to spend time and the basement has been all but abandoned, despite having a nice playroom and a video game console with surround sound. But on the coldest days it was just too much.
Two Reasons this Audit Makes a Great Case Study
First, the family was pretty much in the dark all winter about what they could do about their issues. They love the home and the location, but something seemed wrong and they really did not know where to turn for solutions. The HVAC was running continuously and never caught up.
Here is the other thing too - they just came off of having a home inspection done when they bought the property.
What I have observed from time to time is that a home inspection gives homebuyers a false sense of security, particularly when it comes to insulation.
The inspection is more in line with the old way of thinking about insulation...
I see pink stuff in the attic - all is good.
The box gets checked and you, the end user, is puzzled by the drafts and looking at windows and doors for answers to why it is so cold.
But, as you will see, the inspector missed a few key things and did not give any guidance at the time that would assist the family in finding a swift solution. So, instead, they spent the winter draped in blankets studying their window and door seals wondering if there was anything that could be done.
We cannot blame the inspector though. Some of the key insulation concepts get lost on the best home inspectors. It can get a little complicated.
The second thing that was fantastic about this scenario is that the BGE Home Performance with ENERGY STAR® program helped the family uncover their underlying issues and the incentives, available to all BGE and Pepco customers, paid for 70% of the cost in this case.
"The BGE Home Performance with Energy Star® Program will pay for 70% of the cost."
Sorry, that was worth repeating!
The part about all of this that gets my wheels spinning is how many other people are out there, enduring miserable winters, or hot summers for that matter, that could also benefit from this program in the exact same way.
This case study clearly demonstrates why an energy audit is such a critical assessment for a home to undergo.
The same problems are happening in households everywhere in Maryland.
Energy Audit - A Critical Home Assessment
An energy audit can illuminate comfort problems that would otherwise stay hidden in plain sight and this case study is a classic.
The Symptoms for this BGE Customer Case Study
-HVAC running all of the time
-Never really feel warm on the cold days
-Shockingly high energy bills
-Cold basement
-Drafty top floor
-Cold master bathroom
-Cold kids bedroom
I want to stop here and place a little emphasis on this list.
I believe that this is where the disconnect exists for a customer that has these issues in their home and never gets an energy audit done.
There is an expression that my dad would use - "if I had a nickel for every..."
If you add up all of my energy audits over the years, I would say that I would have fully completed roughly 1300 of them. And, if I had a nickel for every customer that blamed their windows and doors - I would likely have 40 bucks (that is about 62% of the people if you don't wanna do the math).
The underlying message here is that if you have not gotten an energy audit because you think it is your windows and doors, then you might be surprised.
Most people that have the audit done always seem quite enlightened by what is actually causing their problems.
The Case Study - Figuring Out the Root Cause
An energy audit is a process of gathering data points around your home. The volume, square footage, foundation layout and type are all important to help you find the best solutions for making things better.
Sometimes, the first hour of an audit does not prove to be fruitful in terms of "opportunities" for improvements, or retrofits. A well trained energy auditor never wants the cost of the project to outweigh the benefits. An auditor is on the hunt for the low hanging fruit.
As an energy auditor, you can have some fun with this.
It can be much like the game show Let's Make a Deal. Every door you open to an attic or crawl space presents a unique set of circumstances that will either prove to be a great chance to move the comfort needle for the customer or it could be a dead end.
Now, this can also be kind of a slippery slope. Great opportunities also come with a cost. Meaning, if your home is stubbornly uncomfortable and the places that require insulation are under insulated and accessible that is fantastic because you can fix it! But, it also means that you have to spend money to do so.
But, as mentioned, there are incredible incentives through BGE and Pepco available to help manage the cost.
Time to Investigate the Attic
This particular home has two sections of accessible attic space. One access point is in the hallway.
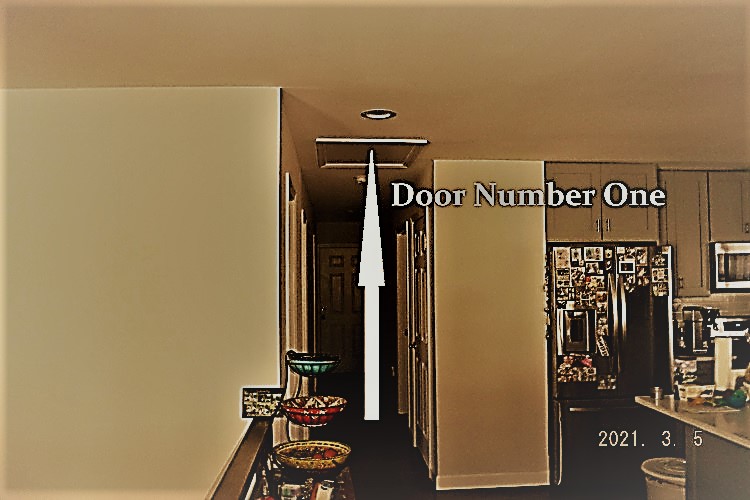
I took a trip up through door number one to inspect the attic space.
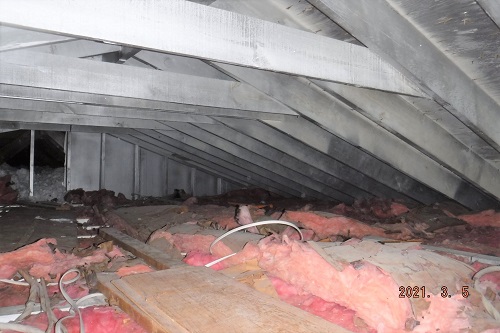
The first sign upon poking my head up is that the attic floor is insufficiently insulated. One thing I have learned through the years is that those with some of the biggest issues have rolled batt insulation in the attic as this home did.
Read what John Krigger and Chris Dorsi say about fiberglass batt insulation in the book Residential Energy: Cost Saving and Comfort for Existing Buildings
"All of the common facings attached to fiberglass batts are air barriers and most are vapor barriers. However, their effectiveness as an air barrier depends on nearly flawless installation."
Fiberglass batt insulation is almost always not installed to perfection.
Now, I can't be sure about what I am about to say, but this is where I believe most energy auditors stop. They take a quick peak at the attic and draw every conclusion for that specific attic area without proper investigation.
I take pride in going the extra few steps and I find that is usually proves to be beneficial - for my customers. The rule is if I don't really want to go over to that spot then chances are not too many people do and therefore there could be a problem there that nobody has ever seen.
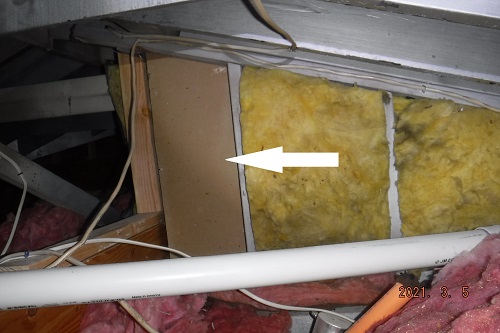
When I got in the attic and made a 180 degree turn, I saw what appeared to be a knee wall that was missing insulation. The area was in a tough to reach part of the attic.
I decided to go around the corner to see what was going on because it was not quite making sense to me. As with anything that you do on the regular, patterns emerge and a more comprehensive understanding of what you are doing comes over time - aka: experience.
Adding to my sense of curiosity was the fact that during my initial tour of the home, the customer had pointed out to me that some remodeling was done in the vicinity below before they bought the home.
A good home energy auditor has to be a like a sponge, absorbing bits of information throughout the time at the home so it can all be pulled together to produce sound solutions.
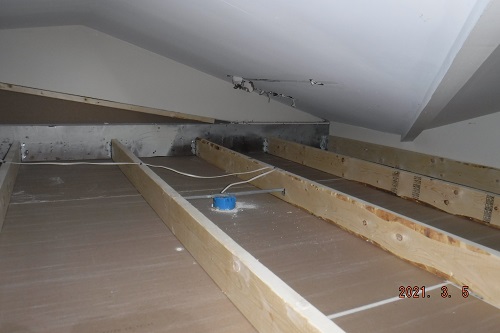
Then, once I was able to poke around the corner this is what I found. A ten by ten area of un-insulated attic space hiding behind that wall.
This is important for two reasons.
Reason One - it speaks to the issues that they were experiencing on cold days. Having insulation at the attic floor is the most important place to build the insulation boundary because the pressure is greatest.
Hot air rises in a building and it wants to fly right out of the top and will if you let it. Cracks and crevices are certainly big time issues for this, but because insulation slows the transfer of heat, the thin drywall alone is no match for the heat to escape at very high rates.
Missing insulation is a big time issue. In an earlier article I wrote about how I examined the impact of an un-insulated three by six foot area in an approximate thousand square foot attic (2% if the area) equated to a 25% reduction in the overall R-value of the insulation in that particular attic.
Reason Two - it produces a larger incentive through the BGE Home Performance program. Some of the rebate calculations are based on how much insulation an attic currently needs and when there is nothing, it pushes the incentive up.
Missing the un-insulated area and modeling the home as if it did have insulation in that area would be cheating the customer.
My final mission while in this section of the attic was to determine if I could make passage to the other side of the home and I was able to confirm that I could not and had to use the second attic entrance.
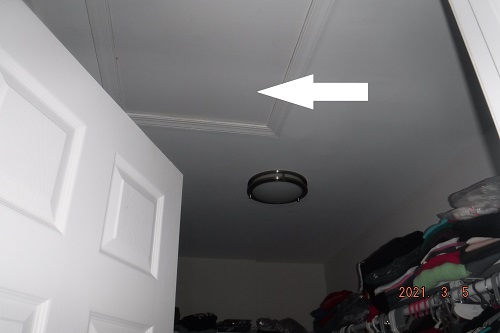
Second entrance to the attic was located in the master bedroom closet.
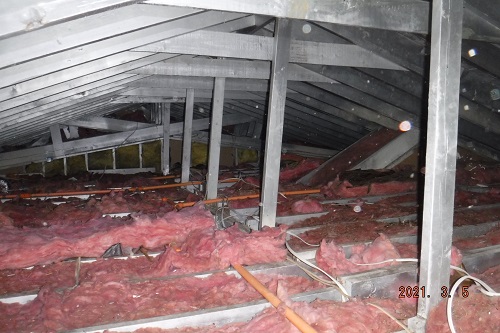
More of the same in the second attic area.
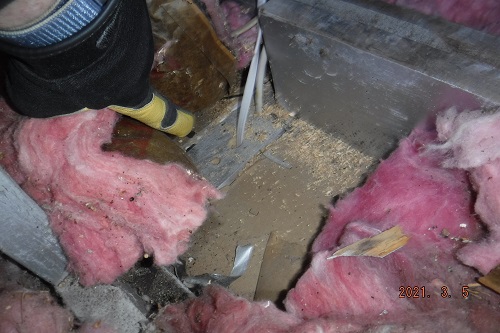
The verdict is in! This attic needs to be air sealed and insulated. Time to run the numbers!
How Does this Program Pay for 70% of the Cost?
In order to help you understand how this program works, I will share the exact numbers from this project and how it worked out so favorably for this customer and you can hopefully gleen information to compare to your own situation and see if you can benefit like the family in this scenario.
But, if you don't have all or any of these characteristics in your home, that does not mean you will not qualify for rebates or that an energy audit won't uncover some totally different issue for you that will find a way to make it well worth your while.
The Numbers
Prioritized List of Energy Efficient Improvements

Total Cost of Improvements: $9500.00
BGE Incentive for this Project: $6640.70
Total Ratio: 70% of the total cost
Financial Analysis
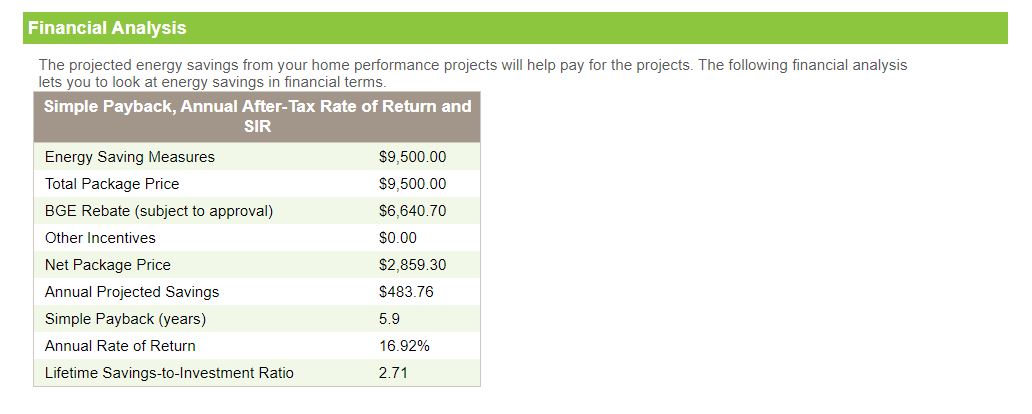
A financial analysis will indicate annual realizations and provide simple payback years.
How many home improvement projects actually pay you back?
Summary of Proposed Improvements
Whole House Air Sealing
When receiving rebates through the BGE Home Performance Program with ENERGY STAR, the blower door test is an integral part of the overall incentive structure and it is tied in many ways to each individual item listed on the list of improvements.
For example, when treating the attic on this project, by far the largest component of the improvement plan, sealing must be done at the attic floor so that the insulation performs to the R-Value it is designed to meet.
Basic Air Sealing
This is also a key to the whole house air sealing plan. At the end the house is tested again for air leakage. The overall leakage is reduced by the acceptable figure established by the program (10% minimum to qualify).
Rim Joist - Accessible
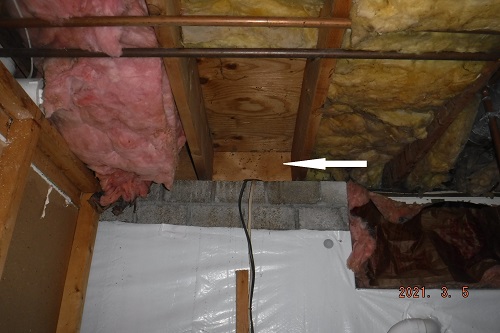
The top of the foundation wall in any home is leaky and needs to be sealed. The question is how much of the area is unfinished and accessible to keep the cost vs. value in line.
Knee walls/Vertical Attic Walls/ Slope Transition Locations
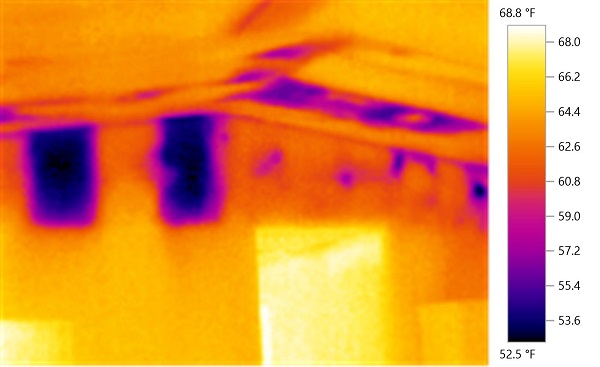
Not all homes have knee walls so this section may or may not apply. Knee walls are very difficult to visualize. Photos can help.
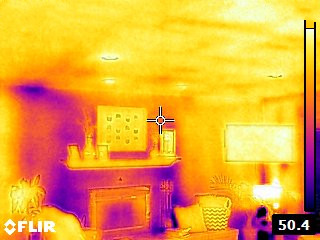
Top photo: thermal image of the knee wall that is created by the transition from a sloped ceiling back to a flat 8' ceiling.
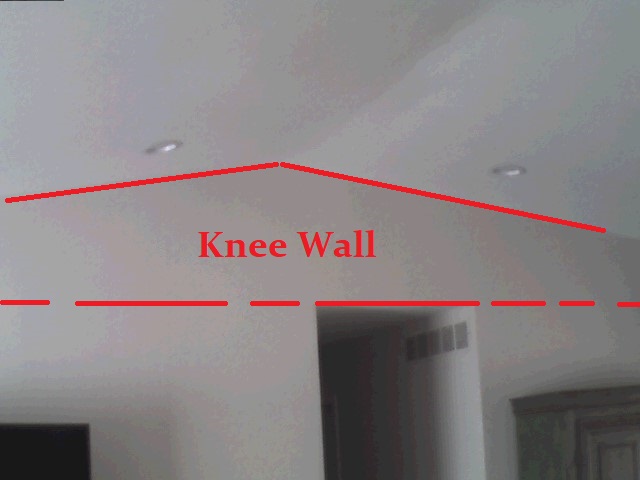
This image is taken at the exact same time the top thermal image was taken for point of reference.
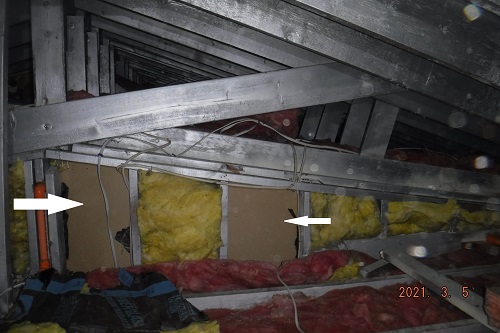
This is a look at the missing insulation at the knee wall from the attic.
Attic Insulation - Sloped and Flat Areas
Once all of the "little" things around the attic and basement have been sealed and insulated and the attic floor areas have all been sealed, it is time to lay down the blanket..so to speak.
Blown Cellulose Demo
Improvement Results
Getting a considerable rebate on a project around the home that you still have to come out of pocket some money for won't be worth it if the results are not there.
The great thing about the BGE Home Performance with ENERGY STAR program is that we measure the results at the end. This is done in a few different ways.
Visual Inspection
Once the work is done it is the responsibility of the energy auditor assigned to perform the final test to check the work that was done. If they were not on the job, this can be done by simply looking in the attic. The blower door test will reveal if air sealing was not completed, but it is very difficult to look for air sealing once the insulation has been installed.
Blower Door Test
The Blower Door Test
When the blower door test is done at the audit the "test-in" measurement is recorded. A portion of the incentive and the customer's long term savings and comfort is also tied to the blower door test and that is why it is so important to the overall job process and the BGE program.
Here are photos of the actual blower door test results for this case study. The numbers look really good!

|
Air Flow at Test-In = 4949 Cubic Feet Per Minute After Air Sealing Air Flow at Test-Out = 3552 Cubic Feet Per Minute 28% Reduction |
Take a look at a short example of how we measure air sealing results with a blower door.
Customer Satisfaction - Measured Results
It is one thing to hit the mark on the numbers and achieve the goals when it comes to measuring the work that was performed.
Another part of a successful Home Performance with ENERGY STAR project is the customer's overall experience. It certainly would be fantastic to have a more comfortable home with lower bills, but having a pleasant experience along the way should also play into things.
Based on a recent review by the customer on Google, it seems like we hit the mark on this one too! Making this a successful project all the way around!
"Had a great experience with Eric and his team. Eric conducted our home energy audit taking time to point out and discuss the good and bad, answering all my questions. He also took care of the whole rebate process with the local utility. All phases of project completed in about 3 weeks. Easy and painless. Definitely recommend Eric and the Hometrust team!"
Need Advice on How to Do Something Like This?
If you are interested in making your home more comfortable and more efficient, give me a call. We can discuss your situation and likely getting a BGE or Pepco Energy Audit is the way to go.
Incentives through the program can be quite advantageous, particularly for those that know that they have to get this problem resolved once and for all.
Furthermore, an energy audit can uncover other factors that can contribute to your specific issue as each home is different - even the same model across the street.
Give me a call! I'd love to help you out!
Written by Eric Gans
I have over 1000 energy audits under my belt in Maryland. I like to take my personal experiences with each of my audit customers and try to get the things that concern them out into the world so others can make good home improvement decisions - in the right order - according to their needs.
Most homes nowadays have air ducts that condition the inside of our living spaces. Ducts are largely responsible for keeping us warm in winter and cool in summer.
And, yet despite their importance, they are often overlooked.
Aside from the obvious, like making sure ducts are connected, there are other nuances that must be understood to prevent other potential issues. For example, leaky ducts in summer in the wrong location might lead to condensation resulting in water damage to ceilings or wood.
This article will examine summer condensation issues related to ducts that run outside of the "envelope". This would include ducts that run through a garage (the focus of this post), crawl space, attic or cantilever also known as an overhang.
Watch the Four Part Process First - Then Learn How it Came About
Part 1 -The blank canvas. A fully removed plaster ceiling including the removal of nails and screws. The area beneath the ducts has been swept and protective platic has been installed to keep the area clean and neat for the customer once the project is completed.
Part 2 -Application of the spray foam on the different areas of the HVAC supply plenum. During this portion of the video, the foam bonds to the duct and seals and insulates rapidly.
Part 3 -Removal of excess insulation after it has fully cured. This is done in preparation for the drywall ceiling installation later in the week.
Part 4 -A look at the completed portion of the duct sealing and insulation project to get a feel for the final product.
Initially - I Was a Little Worried About this Project
According to my eventual customer, the garage ceiling insulation project had already been contracted to be done and when the chosen company showed up to do the work, they promptly turned around and said it was too much for them to handle. That, in turn, prompted the customer to call me.
But, when I went out to take a look at the garage and all that was involved, it did not appear to be too much as far as I was concerned and I quickly got to assessing the situation for the best way to get it done!
Insulated Ducts Are Not Sealed Ducts
If you so dare to pop your head in the attic and you see that your ducts are insulated you cannot simply assume that everything is in good shape. Ducts are metal casings that have seams and connection points. Not all duct insulation is designed to seal the small air leakage around seams.
Older ducts in older homes like the ones in the garage example below were not made as precisely as they are today. Some systems have slots and cracks from shifts that occur normally in a home.
Additionally, houses go through changes and therefore the paths that the conditioned air takes have to be altered.
One example can be seen commonly when the central furnace/ air conditioner is replaced with a larger unit at the same time an addition is being put on a house. The larger system is now being called upon to provide heating and cooling to the new living space.
During this process, the existing ducts are "tapped" so that new ducts can be run to the addition.
It is during these re-configurations where some of the largest gaps and cracks can be detected in the ducts. Of course, the ones you can get to should and can be sealed, but the harder to reach leaks in the areas outside of the "envelope" are the ones that can be trouble.
Garage Ceiling Example
In this example, the home was built in 1958. For a home built in 1958, it was likely cutting edge. Living space over a two car garage with a design that included ducts running through the ceiling to service the space above. In theory, it was practical, efficient and ahead of its time.
But, as each and every Maryland summer would introduce new hot, humid air into the garage it would find its way more and more into the the space between the garage ceiling and the floor to the living space above and as the central air conditioner was improved and likely the sized increased - the ducts began to form condensation.
Drip...drip...drip...and eventually the water actually blew right through the insulation that was installed when the home was built (can be seen in photo below). Soon after, the plaster ceiling began to deteriorate and it had to be partially torn down.
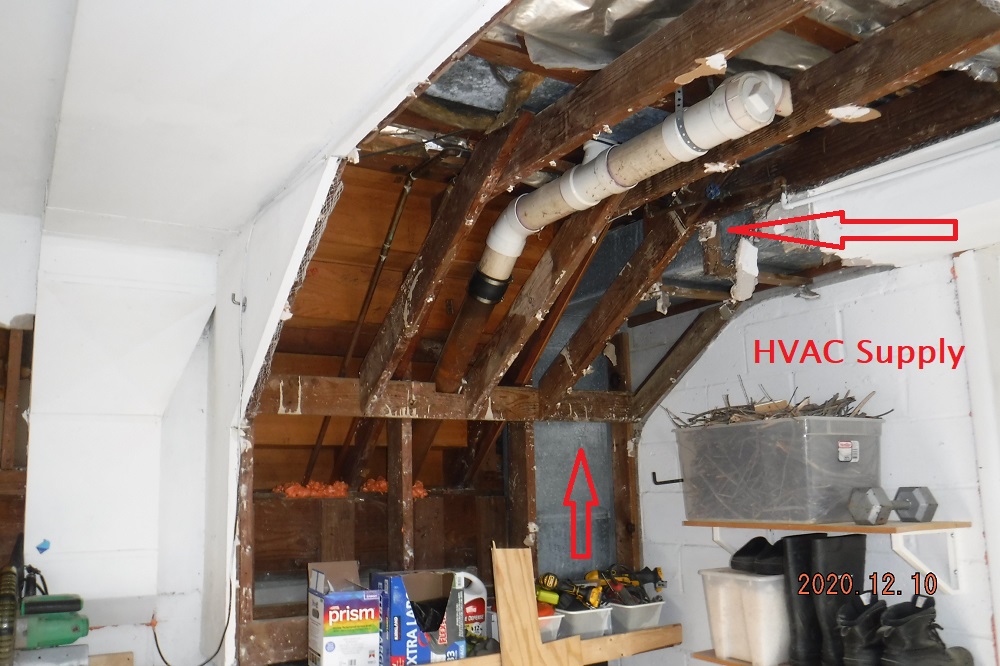
Photo taken during initial inspection. Partial demo had already begun.
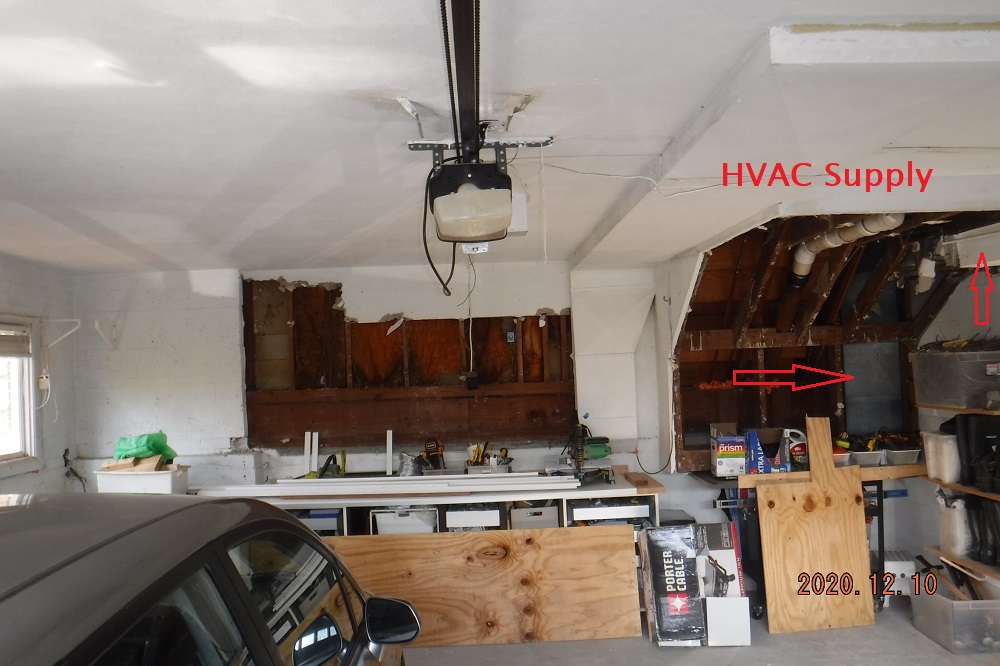
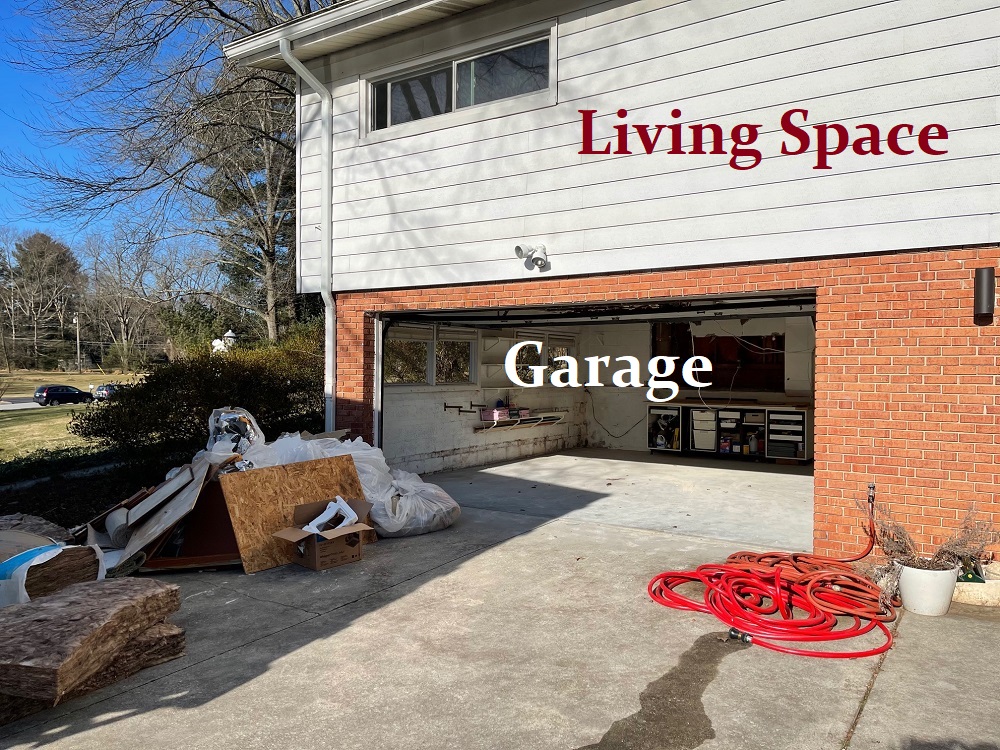
A little more perspective of the area to be treated due to duct condensation issues during summer months.

Making the Most of the Situation
The driving force for this homeowner to take on this project was the duct condensation and the long term issues that can come about if they go untreated. But, another reason for taking this on was due to the cold bedrooms above during the heating season.
It was clear that the old insulation methods and the unsealed and un-insulated ducts running through the outside garage ceiling were contributing to the comfort issues.
So, the plan included insulating the entire garage ceiling area as well. The plaster ceiling was removed on day one, insulation was applied and the area was cleared of all trash and debris.
Day 2
On day two the focus was on the main HVAC supply plenum (duct). Final demo on the ceiling area that encapsulated the duct took place and preparations were made to seal the duct with two part spray foam.
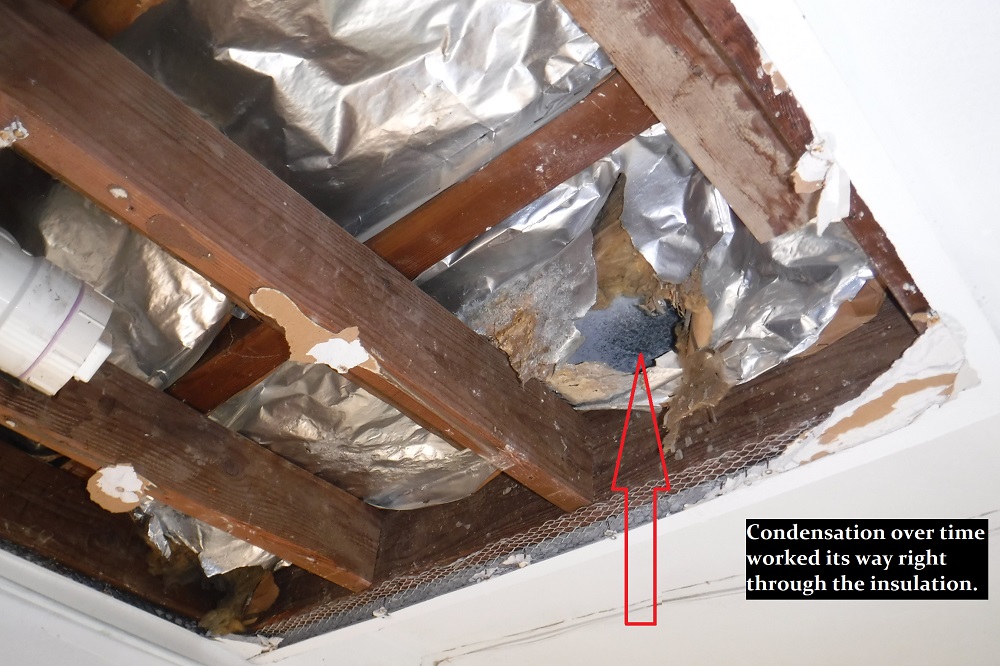
Everything in the photo above is vintage 1958. Sixty three years of water dripping down and creating a major blowout of the insulation, resulting in a damaged garage ceiling.
Special attention was going to be given to this area. Since it was very close to where the HVAC air handler was located the pressure is greatest, therefore the more significant duct sweating that was taking place.
The Solution - Sealing and Insulating in One Shot
Two part spray foam is an effective treatment for a situation such as this one. The removal of the ducts and the disruption and cost would outweigh the additional cost for the more expensive insulation material. Getting behind to seal the tight spaces without having to remove flooring or support bracing is a great advantage of using spray foam.
You can see in the video the amazing capabilities of the liquid spray finding its way behind the ducts and moving to seal up the spaces that we know exist, but would have a tough time accessing otherwise.
Need Advice on How to Do Something Like This?
If you are interested in solving your duct condensation issue, give me a call. We can discuss your situation and likely getting a BGE or Pepco Energy Audit is the way to go.
Incentives through the program can be quite advantageous, particualarly for those that know that they have to get this problem resolved once and for all.
Furthermore, an energy audit can uncover other factors that can contribute to condensation on ducts and the audit may uncover other solutions that render the need to insulate the ducts useless - while still solving the main issue.
Give me a call! I'd love to help you out!
Written by Eric Gans
I have over 2000 energy audits under my belt in Maryland. I like to take my personal experiences with each of my audit customers and try to get the things that concern them out into the world so others can make good home improvement decisions - in the right order - according to their needs.
IECC Energy Code Testing - Blower Door Test
This beautiful new construction house that was completed in summer 2020 located in New Windsor, MD went through one of it's final steps to pass the energy code in the state of Maryland. 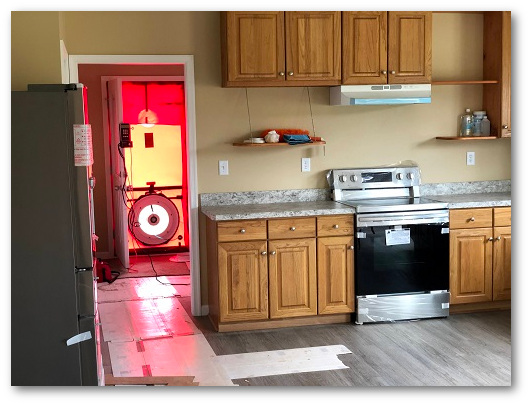
The blower door test, or air leakage test was performed in accordance with the International Energy Conservation Code (IECC) and Maryland Energy Code Compliance.
The air leakage code requires that a house test at equal to or less than three air changes per hour (3ACH).
The test was conducted using the ASTM E1827 - single point method.
The blower door test was conducted five times and each measurement was recorded and entered into the report.
Each test result yielded an ACH number less than two so the house passed with flying colors.
In Carroll County Maryland and many other counties across the country, it is important to consider the building envelope during each construction phase so that your house is sealed properly and it can also easily pass the test.
Tighter houses use less energy and are more comfortable. In a tighter house you control the home's "breathing" rather than letting your energy dollars escape through the various holes to the outside around a typical residential building's shell.
Watch an explanation of the blower door test during a guest appearance at the Montgomery County Energy Connection video shoot.
General Guide to Air Sealing a Home
The blower door test will reveal whether these measures were properly taken during the construction of the home.
1. Air barrier and thermal barrier.
- A continuous air barrier/pressure boundary must be installed in the building envelope.
- Exterior thermal envelope contains a continuous air barrier.
- Breaks or seams/joints in the air barrier must be sealed.
- Air-permeable insulation (fiberglass batts) should not be used as sealing material.
2. Ceiling/attic
- The air barrier/pressure boundary in any dropped ceiling/bulkhead/soffit should be aligned
- with the insulation and any gaps need to be sealed.
- Access opening, drop down stairs or knee wall doors to unconditioned space should be sealed.
3. Walls
- Corners and headers should be insulated and the junction of the foundation and sill plate must be sealed.
- The junction at the top plate and top of exterior walls should be sealed.
- Wall insulation should be in continuous alignment/contact with the air barrier
- Kneewalls should be sealed.
4. Windows, skylight and doors
- The space between window and door jambs and framing as well as skylights and framing should be properly sealed.
5. Rim Joists
- Rim joists should be air sealed (air barrier) and insulated.
- Floors (above garage/cantilever)
6. Insulation must be installed and affixed to the underside of the subfloor plywood.
- The air barrier must be installed at any exposed edge of the insulation.
7. Crawl Space Walls
- Encapsulation is recommended including installing vapor barrier at the floor, sealing and insulating the walls and disconnecting the space from the outside.
8. Shafts, penetrations
- Utility penetrations,
- Shafts for ducts
- Conduits for wiring
- Flue chases that open to the outside or unconditioned space should be sealed.
9. Narrow Cavities
- The proper insulation solution should be used to block and seal any irregular voids.
10. Garage Separation
- Air sealing should be done between the garage and conditioned spaces.
11. Recessed Lighting
- Recessed light fixtures installed in the thermal/pressure boundary should be air tight, IC rated and sealed to the drywall.
12. Plumbing and wiring
- Batt insulation should be cut neatly to conform to any wiring and plumbing located in exterior walls.
13. Shower/tub on exterior wall
- Outside walls connected to showers and tubs shall be insulated and the air barrier installed separating them from the shower and tub.
14. Electrical/phone box on exterior walls
- The air barrier must be installed behind electrical and communication panels/boxes or air sealed boxes should be installed.
15. HVAC duct measures
- HVAC register boots that go through the thermal boundary shall be sealed to the sub floor or drywall to eliminate leakage/waste.
- All ducts outside of the envelope shall be sealed and insulated to a minimum of R8.
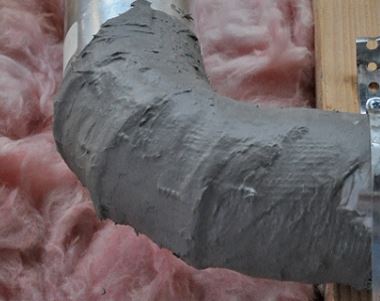
- All ducts inside the envelope shall be sealed at the seams and any other cracks/crevices with Mastic.
16. Fireplace
- An air barrier should be installed on fireplace walls and the doors on a fireplace should be gasketed.
Watch the Blower Door Get Set up in 2.5 Minutes
Towson - Maryland
If you have a Cape Cod style home and you are wondering if you can air seal and insulate effectively - the answer is yes, however not without a good plan.
Houses with Cape Cod style framing stem from being built in the 1940s and 1950s when the cost of heating was dirt cheap and insulation was an afterthought.
Watch a few Cape Cod insulation techniques on YouTube
If you live in this style home, chances are very good that it has not been properly addressed due to the complexities of the way it was built.
Below, you can take a peek at a recent Cape Cod insulation project and what steps were taken to seal and insulate. This one is located in the friendly residential Southland Hills community of about 200 homes in the heart of Towson, Maryland. The homes in the neighborhood were built in the 1940s.
The Comprehensive Energy Audit
Having a home energy audit done when you live in a Cape Cod-style home might be a good idea if you are looking for guidance on how to properly go about creating better comfort and lower energy bills.
The good thing about working with an energy auditor who has experience is that you can gain insights and avoid pitfalls from a person who has seen these areas before and knows what to expect.
Partnering with a pro can help set you on the right path toward measurable results.
 Get a comprehensive home energy audit today!
Bonus Room House!
When I pull up to a home as an energy auditor I have my radar on: What style home is it? What is the footprint of the home? What condition is the home in? Is the heating and cooling gas or electric? These are some of the take-off points to begin a great home energy audit.
One thing at this house stood out to me when I arrived.
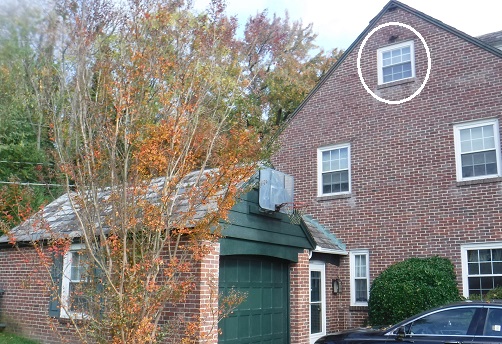
A window at the top of a wall within the side gable usually means the house has a "bonus room". Another, more well-known way to describe the style of home is the Cape Cod style.
If you have a Cape Cod-style house then you know it really means the bonus room is really just an extra dose of difficulty.
The small attic behind the wall at the bottom of the sloped ceiling is usually hard to reach and a source of discomfort and dust due to old/worn insulation, poorly sealed hatches, and general basic neglect (nobody's judging ya!).
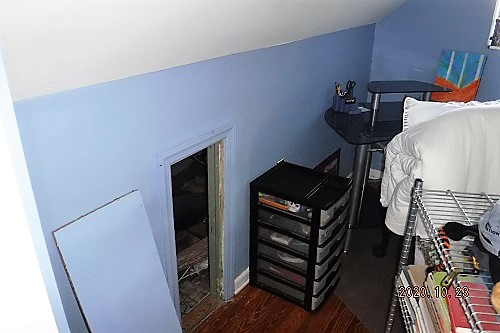
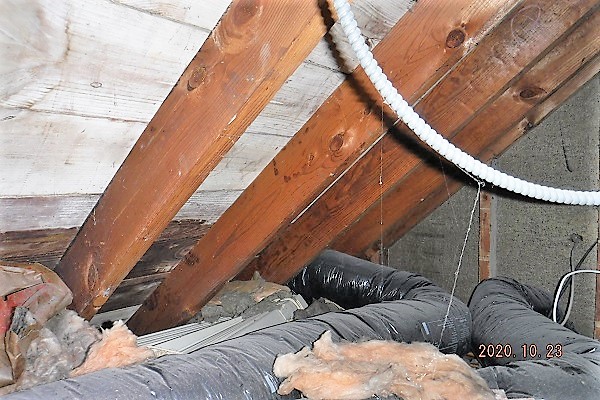
Panel that leads to attic space behind bonus room wall. The attic area is behind the bonus room wall.
I find these attics in older homes throughout Baltimore County and Maryland for that matter and if you take a drive through this Southland Hills neighborhood, it is easy to see that many of the 200 homes built in the development are all of similar Cape Cod style.
How to Make Insulation Decisions in a Cape Cod
The complexities that arise when thinking about how to properly insulate a Cape Cod-style home start to go away the more you see this type of construction style. The problem for most homeowners is that they are not traveling from home to home to manage insulation jobs, taking the time to figure all of this out.
Furthermore, if you are not careful while expending brain power on thinking through how to insulate the roof walls or floor, other important things can easily get missed.
For example, HVAC ducts are typically living in Cape Cod-style knee wall attics. It makes perfect sense. It is an easy conduit to run ductwork to the different areas of the home adjacent to the attic as well as below.
But, this can also bring a whole new set of issues if the ducts are not maintained or if they are old and have been subjected to other changes the house has undergone through the years.
Take a look at this discovery during a Cape Cod spray foam insulation project.
Finding a Good Air Sealing & Insulation Treatment Approach
The best approach to take in a house that is a Cape Cod configuration is to see what the house has to offer as a starting point. What I mean by that is to figure out what areas of the space can be easily accessed.
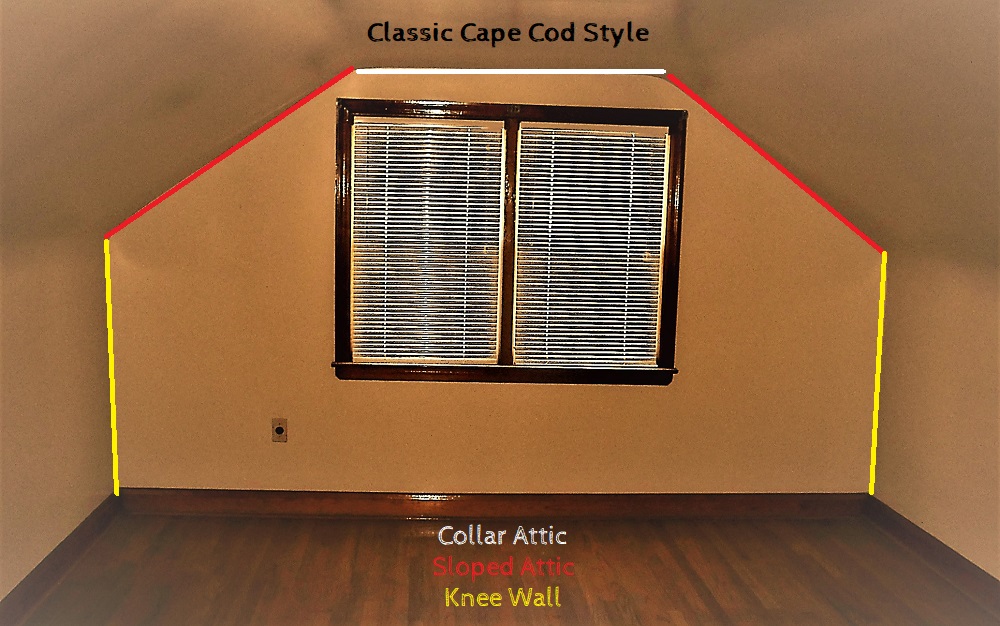
Collar Attic Plan
Treatment to the top flat portion of the attic (called the collar attic) should be evaluated for treatment including sealing and adding insulation. If space permits air sealing and insulation should be installed.
Look at these similarly constructed homes with varying amounts of space above the top flat ceiling. The lines indicate the approximate ceiling location.
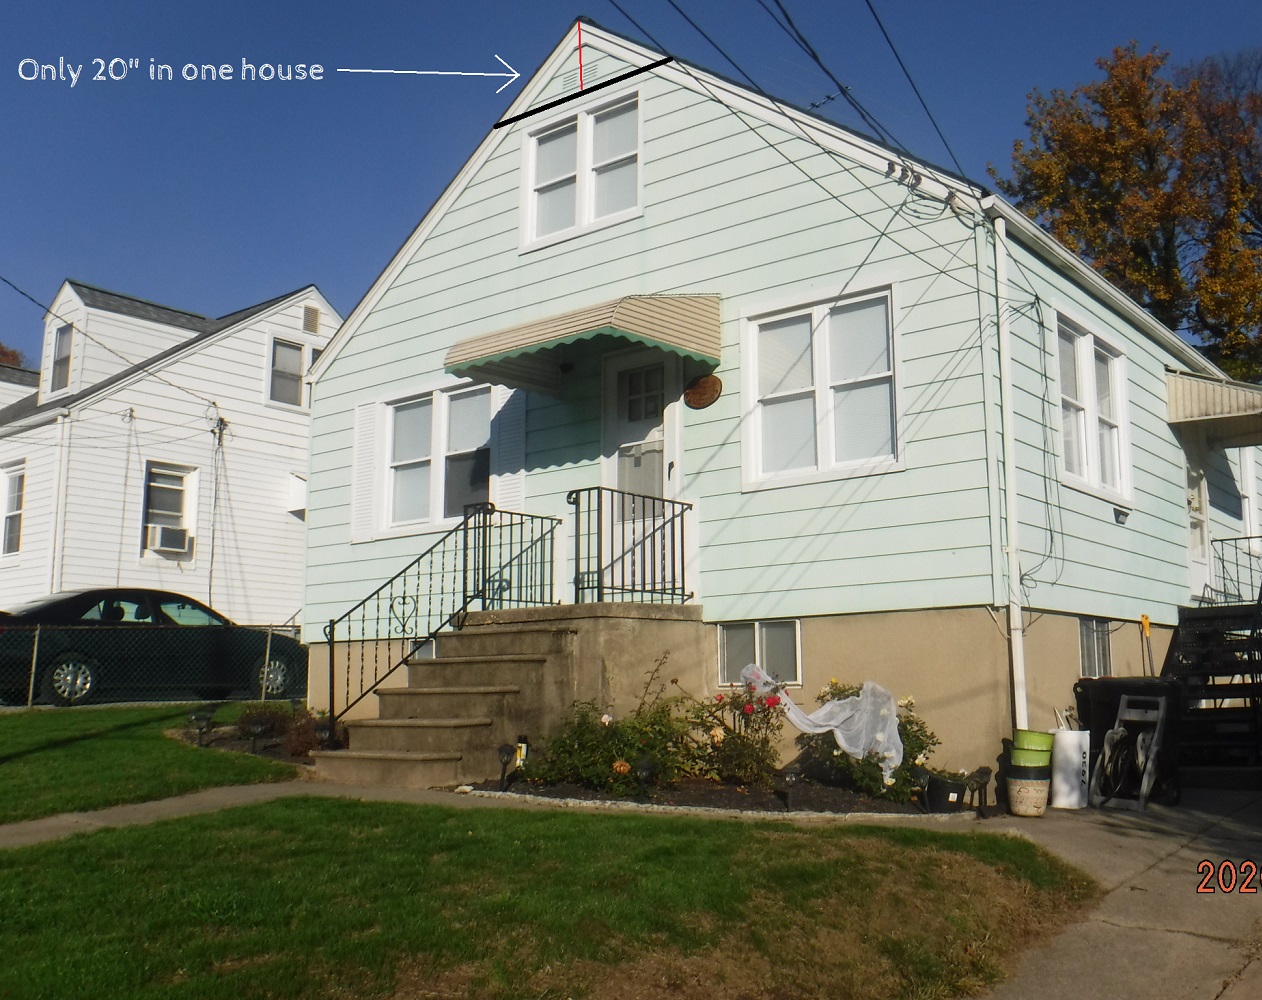
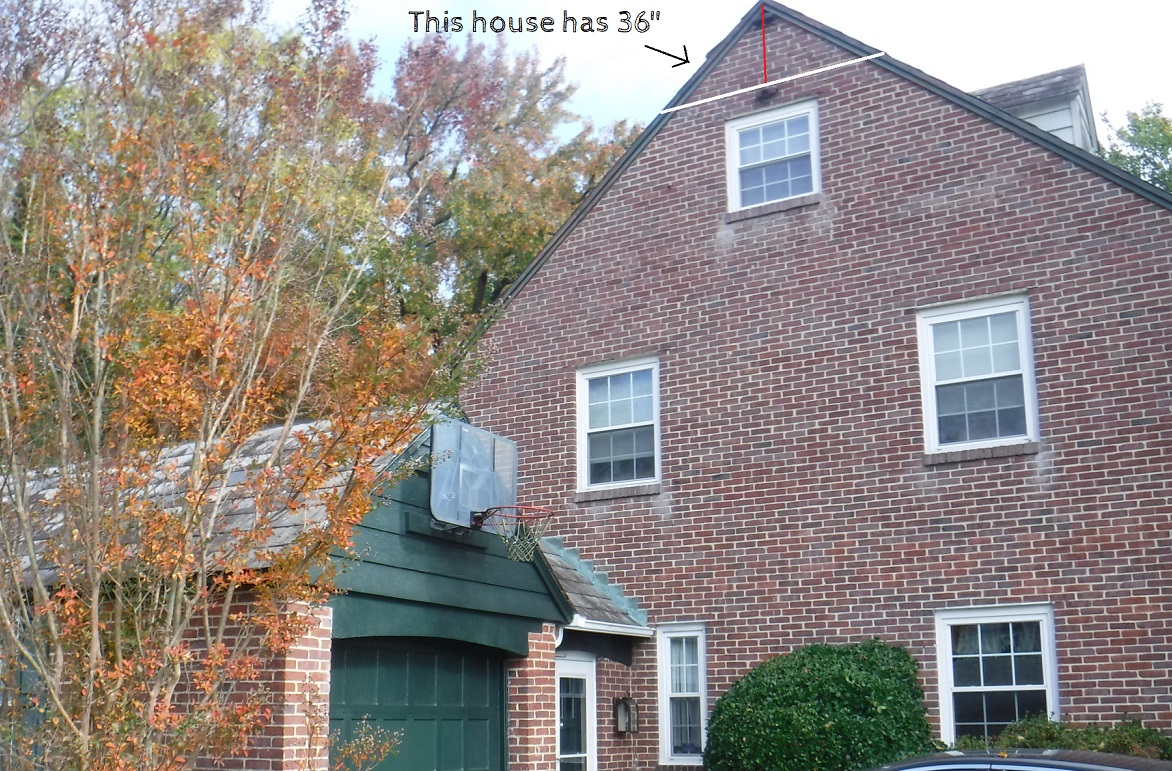
Example Home with only 20" of space Home Where Audit was Conducted has 36" of space to work
In the two different configurations, literally the difference between 16" makes the difference between being able to work in the space or not.
The good news for this home in the Southland Hills neighborhood is that it had sufficient space for a human to work.
Check out some of the details...
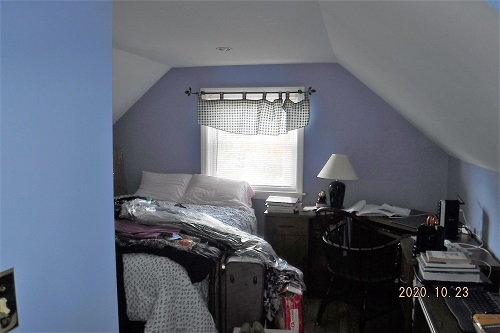
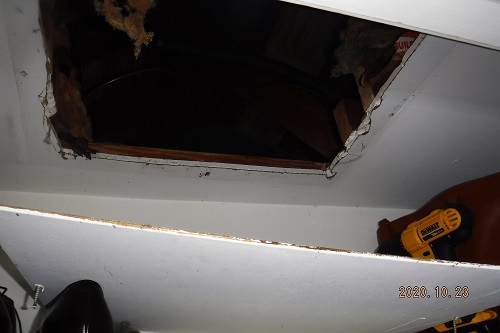
The ceiling measures 7' across. A hatch that was cut for HVAC in the collar attic.
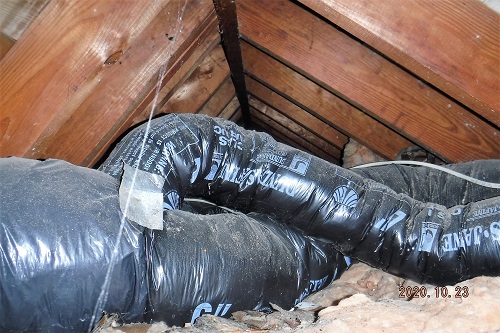
A pop up inside the space reveals not much room to move, but a good opportunity
to make improvements, nonetheless.
At the end of the day air sealing and adding insulation to the collar attic was feasible and recommended to the homeowner. Each Cape Cod collar attic should be independently evaluated for feasibility.
Sloped Attic Approach
Sloped ceiling portions of a Cape Cod attic should be evaluated both visually and with thermal imaging. One possible deterrent for homeowners to treat a Cape Cod attic is that finished sloped ceilings can be costly to re-insulate.
But don't overthink or try to overdo the job. With a few subtle installation techniques, the R-value in the sloped cavity can be increased in some cases, and treating areas that are more practical to reach will only improve the overall leakage of the ceiling bays.
The solution for this home was to seal the cavity bays from below and from above and leave the existing insulation to keep the project within budget.
Knee Wall Areas
Another challenge to getting measurable results when air sealing a Cape Cod-style home is getting to all of the small spaces between the roof and the knee wall.
In many cases, access will need to be made in several locations, so knowing this and prioritizing improvements is critically important.
As an example, don't re-paint the upstairs bonus room if you are considering insulation or if you are finding this article because you are not comfortable in the space and want to find solutions.
Energy auditing, home performance, and the BPI guidelines all work towards finding areas around preexisting homes to treat where the return on investment is positive over time.
In some instances, costs will outweigh value, but when it comes to treating these inaccessible spaces that have older insulation - the gains in energy savings and comfort can really pay off if a little finishing work is required after the project is done adds a little to the overall cost.
Every situation should be evaluated on a case-by-case basis and a home energy audit is precisely a way to figure all of this out.
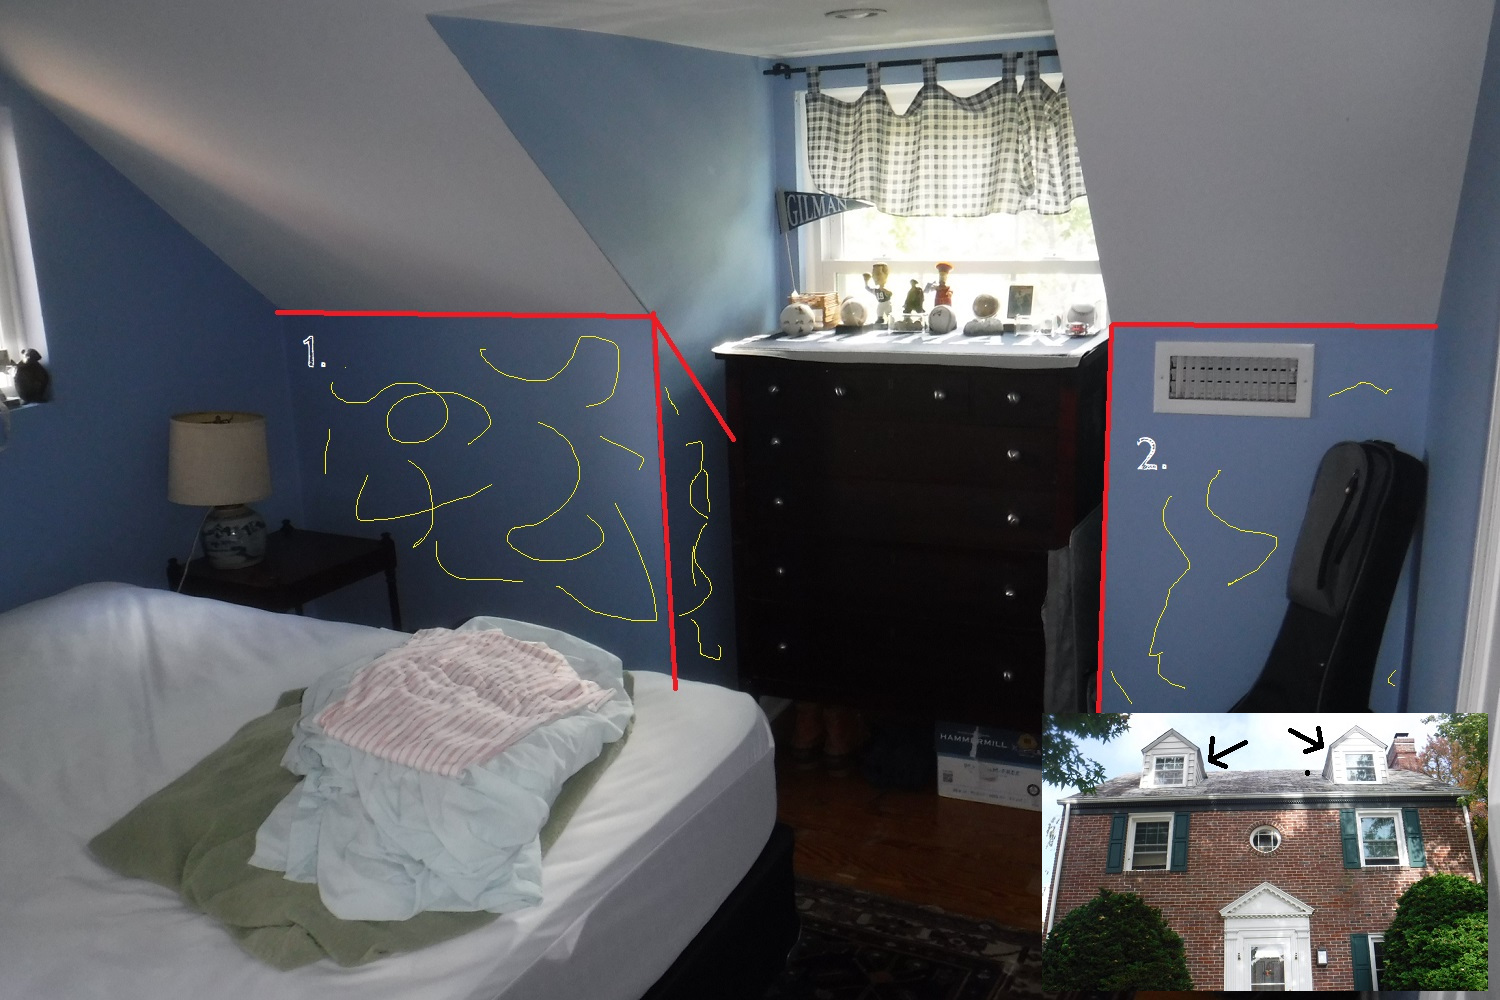
Notice how the front dormer windows create multiple areas that need to be treated, making it a bit more difficult.
Check out how we create access to an attic area that is not currently accessible.
Final Plan: Sealing and Insulating in the Best Locations for this House
The stack effect drives the air change conveyor belt inside your home quite a bit in the heating season. This is due to leakage in the basement and in the attic.
During an energy audit, I am literally "on the hunt" for places where air can infiltrate (come into your conditioned space) and exfiltrate (your conditioned air goes out). Sealing up these two places in cost-effective ways is the name of the game!
So, after careful review and consultation between myself and the homeowner, we decided on the following work scope:
~WORK SCOPE~
|
Foundation -- Air Sealing / Insulation Air seal any penetrations at the accessible rim joist in the basement with two-part spray foam (~60 linear ft) which will also insulate the area to R-19. Attic -- Air Sealing / Insulation Cut access in three wall locations to gain access to the upper floor attic. Reinstall the drywall with a removable panel for future access if needed. Treat three existing attic access areas by adding insulation to each and weatherstripping. (2 walls, 1 ceiling) Add 5-7” of open cell spray foam to the accessible sloped roof surfaces of the knee wall attic areas (~392 sq ft). Blow 10” of loose fill cellulose to the flat collar attic using the existing ceiling hatch in the closet (~154 sq ft). |
Basement Rim & Band Joist - Every Home Should Get this Treatment by the Way
If you are not sure what the rim and band joist are in your basement and if it is accessible for treatment - you are about to find out!
First, put yourself in the unfinished part of your basement. Usually, it is a utility room with an HVAC, a water heater, and maybe a washer/dryer.
Identify your foundation wall at the top and you have found your rim and band joist.
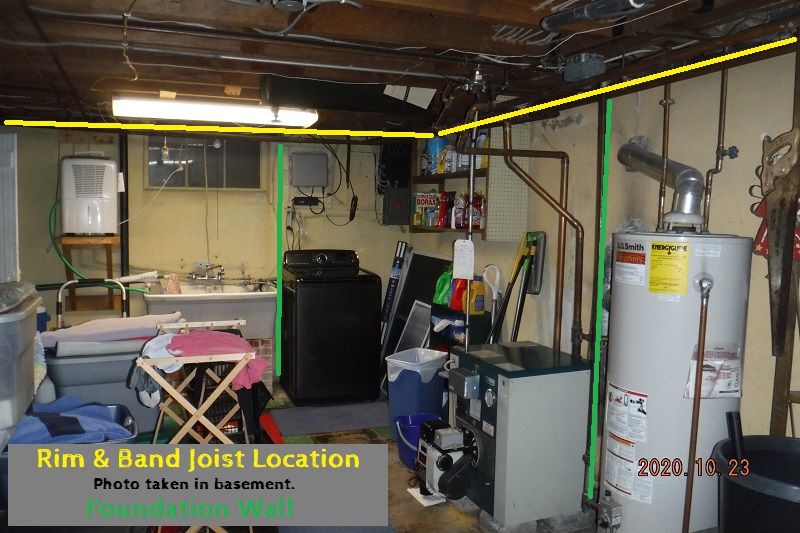
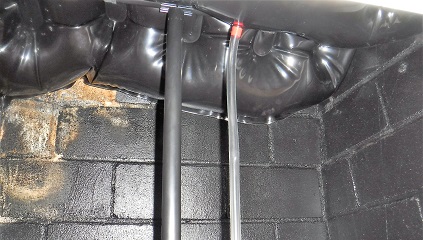
Take a look at how the electrical "main" is coming through the rim joist in the basement of this Towson, Maryland home performance home. This is happening in a lot of homes.
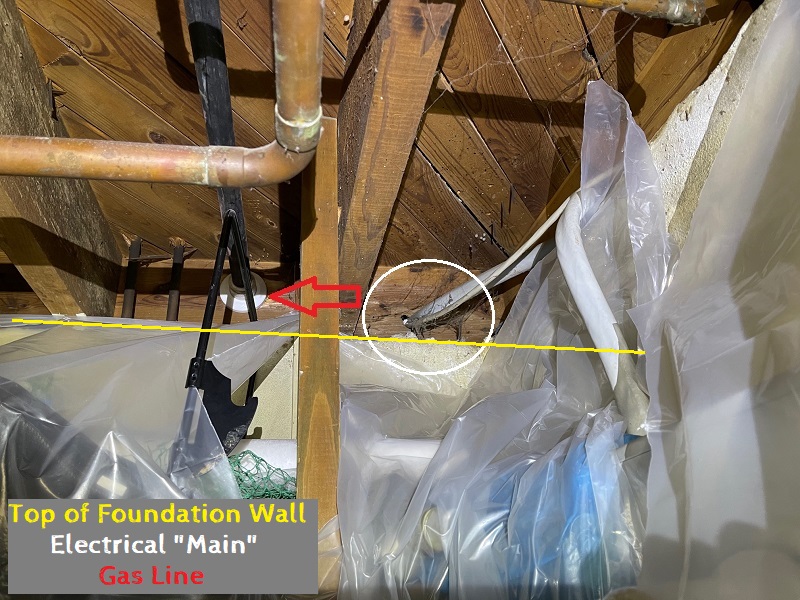
Look at the size of that hole. And this is the point - it is a hole going directly to the outside which means this:
Summer: humidity infiltration
Winter: cold air infiltration
Just look at those spiderwebs. The spiders like to make their traps where the air is moving. It is instinctual. So if you see a spider web, air is flowing.
Now get your full frame of reference by watching this short video clip that shows where the electrical main and gas line enters into the rim joist from the outside which appears "invisible", but it is not.
Results - A Look at the Final Project and the Test-Out Numbers
Rim and Band Joist Treatment - Closed Cell Spray Foam
Watch the spray foam team treat a portion of the rim and band joist in this up close and personal clip.
Knee Wall Attic Treatment Before / After
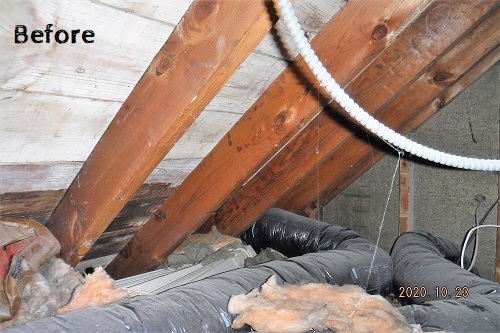
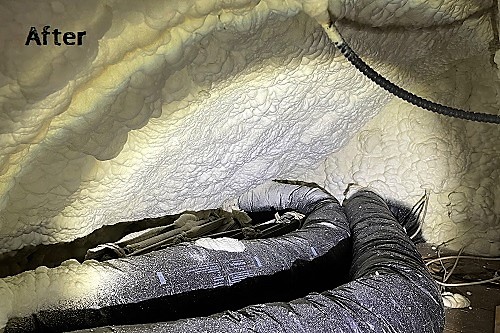
Example of Knee Wall Encapsulation
Blower Door Results
Many factors drive the overall reduction in leakage that each home is scheduled to achieve during a home performance project through the BGE program. I make this very clear to my customers that for every house I believe we can get a 30% reduction and if there is a home that I am convinced we can only achieve the minimum required to meet the program standards (10%) - only to exceed that by a lot.
As a result of many audits and challenging situations when I was wrong, the partnership I formed with this customer went a long way. We both agreed that a 20% reduction was a good target and that due to other factors that were not reported here, we will do everything we can to nail the work scope and see where it takes us.
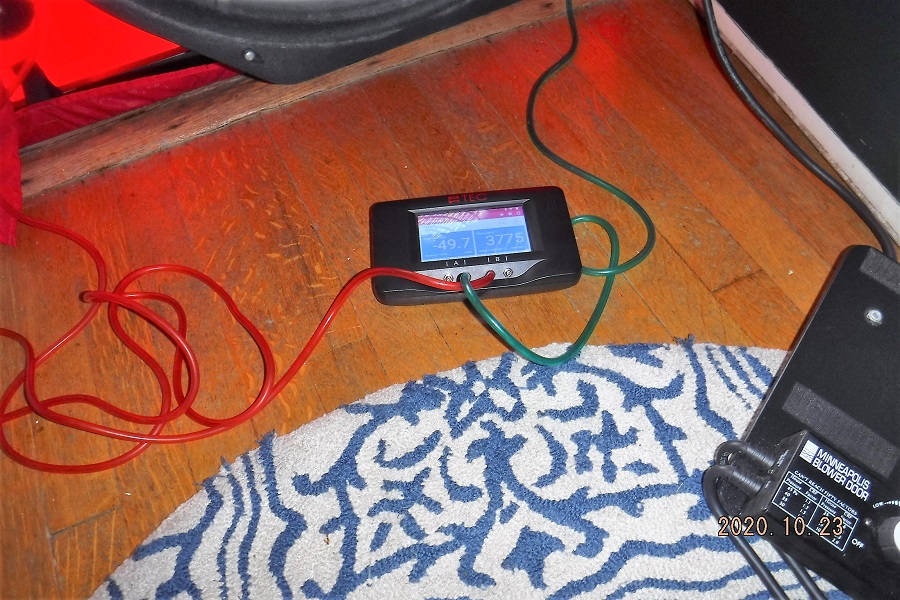
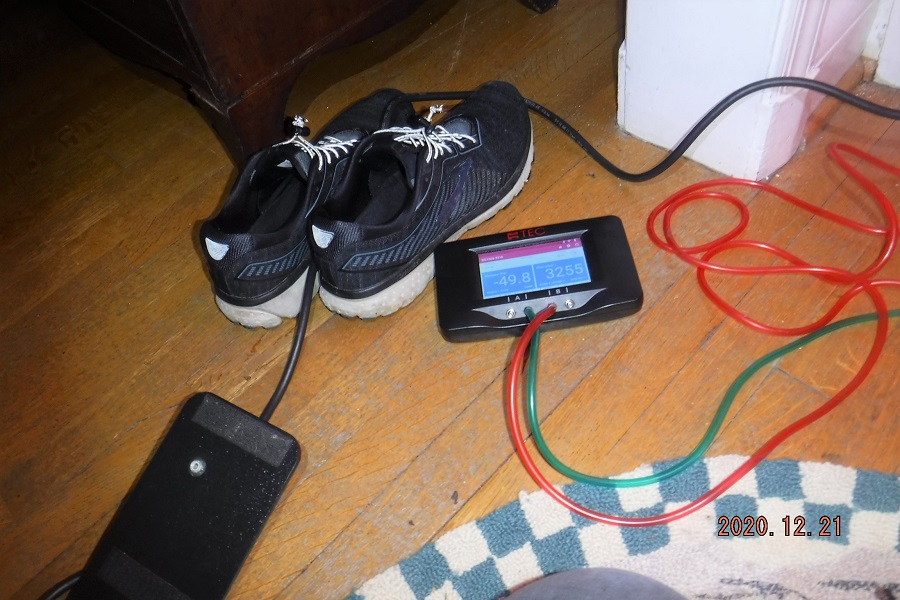
Ultimately, this home performance project achieved an 11% reduction in leakage.
Initial Blower Door Test In CFM: 3775 Cubic Feet Per Minute at Negative Pressure -50 Pascals
Final Test Out Number: 3255 Cubic Feet Per Minute at negative pressure -50 Pascals
Need Advice on How to Do Something Like This?
If you are interested in making your home more comfortable and more efficient, give me a call. We can discuss your situation and likely getting a BGE or Pepco Energy Audit is the way to go.
Incentives through the program can be quite advantageous, particularly for those who know that they have to get this problem resolved once and for all.
Furthermore, an energy audit can uncover other factors that can contribute to your specific issue as each home is different - even the same model across the street.
Give me a call! I'd love to help you out!
Written by Eric Gans
I have over 1000 energy audits under my belt in Maryland. I like to take my personal experiences with each of my audit customers and try to get the things that concern them out into the world so others can make good home improvement decisions - in the right order - according to their needs.

Written by Eric Gans
I used to be a window contractor. More recently, I have tested thousands of windows as a certified energy auditor.
-2-6 min. estimated read time to get the information you need
Table of Contents
As a former window contractor turned certified home energy auditor I have been on both sides of the coin when it comes to replacement windows.
Early on I was convincing people (with the right intentions and wrong information) to replace windows to solve draft issues.
Now, I am on the other side getting called out for an energy audit to check windows because the new and old windows always seem drafty.
In fact, most people immediately connect comfort problems to windows and doors.
But, it usually turns out to be bigger problems that are lurking and they don't cost nearly as much to fix!
It took me years to figure it all out, but when you stop and think about it all for a moment - it really makes a lot of sense.
Here are five reasons that can help you answer the question:
Why do my windows feel drafty?
1. The Windows Are Not the Draft Source to Begin With

FACT: Windows Account for Only 10% of Total Air Leakage in a Typical Home
A misconception for most homeowners is that windows are the only location in your home's "shell" that air can get in and out.
But, there are many other places around your house that might be much more connected to the outside than windows.
And, a lot of these gateways are hiding in plain sight!
If your home is stubbornly drafty you need to think about the issue in three-dimensional ways. This does not mean that you wasted money on windows or that you need special glasses. It just means that you need to shift your hunt for the drafts by starting to look up and down instead of only through the sides.
FACT: Air needs some help to get through cracks and crevices around your home and the pressure inside your home is greatest at the top (attic) and at the bottom (basement/ crawlspace).
"If your home is stubbornly drafty you need to think about the issue in three-dimensional ways...shift your hunt for the drafts by starting to look up and down instead of through the sides."
Read on to learn about the stack effect and how getting the basics from this physics phenomenon can help you begin to think in three dimensional ways about drafts.
-Back to Top-
WATCH ON YOUTUBE
2. Understanding Stack Effect & How it Can Solve Your Draft Issue
In the book Rich Dad Poor Dad by Robert T. Kiyosaki, he talks about how as school children we are never really taught the vital lessons of personal finance and how to stay out of debt and save for the future.
Similarly, I say everyone should learn about the stack effect when ready to purchase a home.
Understanding how it can play a big part in drafts around the house can really help you with better comfort and overall energy efficiency.
The stack effect can be simply understood by taking one concept we all learn as young children: Hot Air Rises
Here is the part they don't tell you when it comes to your home.
When the warm air rises in your house it creates a lot of pressure at the top and it escapes through all of the holes in your ceiling right up into the attic if modern insulation techniques are not in place.
Many of the holes where this is happening you cannot see, but they do exist!
Check out this 15 second video that demonstrates one common place air escapes at the top floor ceiling.
This problem causes a conveyor belt in a sense. When the warm air goes out at the top new cold air gets drawn in down low - from the leaky parts of the basement or an open crawl space.
As an example, the stack effect is the reason recessed lights in the top ceiling and rim joists down around the foundation should receive way more attention than windows.
Older, slotted recessed lights are no match for the warm air pressure, causing a warm air LEAK! As it leaves, cold air comes in from down low.
As a result - your comfort and money go in the attic and you feel drafts.
An Energy Audit Can Point Out Basement Air Leakage
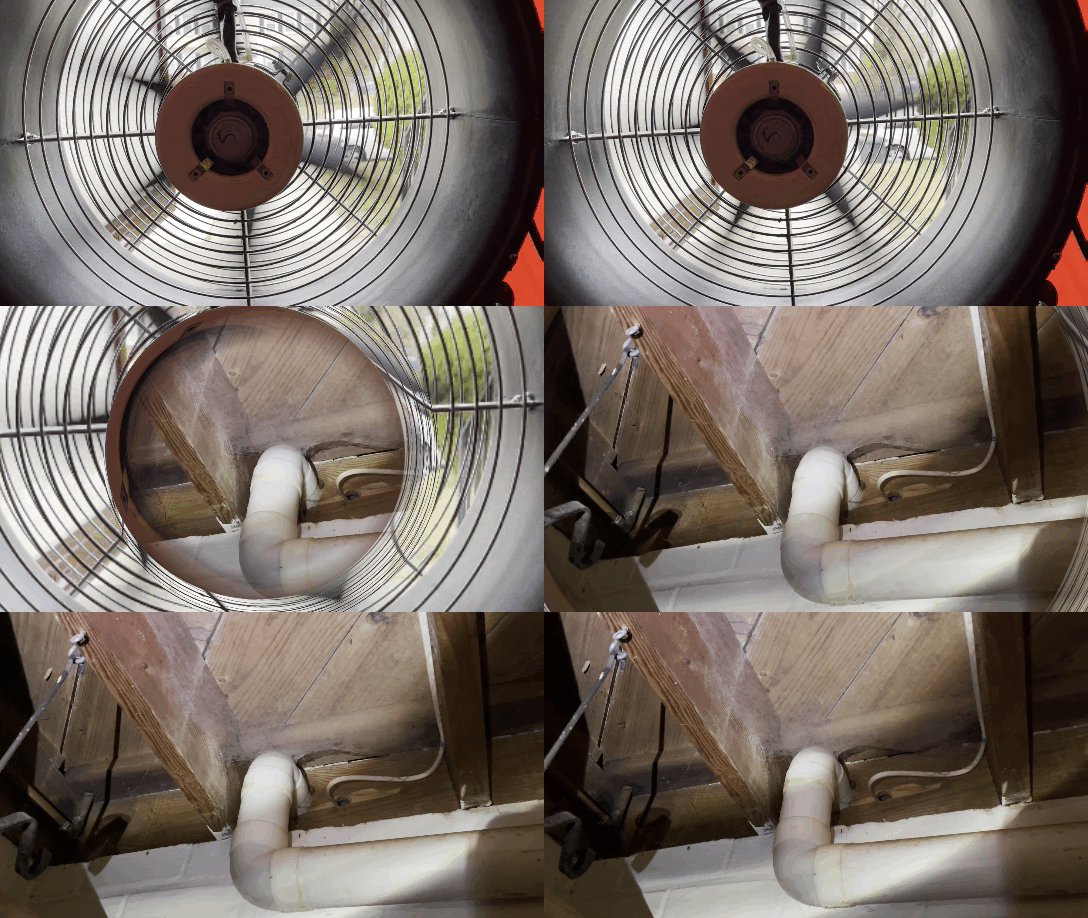
Shown: Air Leakage in Basement @ Top of Foundation Wall (rim joist) During Blower Door Test
3. Fireplace Flue & Recessed Lights - Sealing Up "Gateways" to the Outside
One easy way to find drafts is to look for the "gateways" to the outside.
For example, one out of every five customers that I do an energy audit for does not have the flue shut on their fireplace chimney which is a huge gateway to the outside.
Recessed lights are also gateways to the attic (outside) and it is a good practice to check the dampers on any exhaust fans you have venting to the outside. A mis-aligned, damaged or non-existent damper can be a real draft maker.
Sealing Solutions
- Covering and sealing can lights at the attic floor
- Improving household exhaust terminations
- Use a chimney "balloon" to seal faulty flue dampers


Watch How we Seal Big Holes in the Attic
Then We Measure How Much We Sealed the House
Here is Something to Chew On:
Your window contractor will not measure this for you.
4. Improperly Treated Crawl Space/ Basement
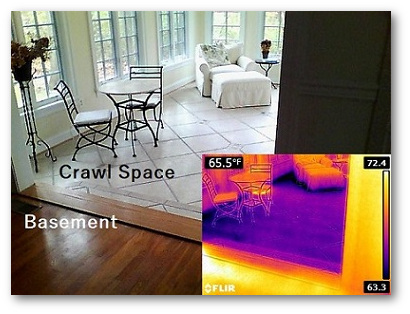
If the construction style of your home is on a crawl space that is open, then you might experience high drafts.
An open crawl space will allow unconditioned air into the the crawl space and unless there is a proper pressure boundary separating the crawl space from the room above, then drafts will surely occur.
Open crawl spaces traditionally have vents in the foundation wall. The theory is to allow fresh air into the space and keep it dry, but in actuality the complete opposite happens in summer. Crawl spaces become breeding grounds for insects, moisture and both want into your house! In winter it is a constant source of cold air into your home.
If you have a full basement it is very likely that the rim joist in any finished or unfinished area has not been properly air sealed and this will allow air infiltration in the basement area that will cause drafts through walls and floors into the living space above.
Check Out this Test I Did
I tested the house before any work, after air sealing, and then after the windows.
Can you guess which was more effective?
5. Improperly Installed or Misaligned Windows

Another possibility for drafty new windows, however the least likely, is that the windows were installed improperly or worse yet, not caulked and sealed.
Even if this is the case, it would still be difficult to make a draft problem worse with new windows even if the windows are incorrectly installed due to pressure dynamics in a house.
It is important to note however, that basement windows and windows on the second floor could be susceptible to leakage if not properly installed and sealed due to higher pressure.
Make sure your windows are fully closed and locked!
Another common issue that homeowners with new replacement windows have problems with is making sure that top sash in double hung windows (most common type) are pushed all the way up in the u-shaped header.
When new window users are not accustomed to both sashes of the windows being operable, the thought that the upper sash dropping down does not come to mind and the notion that the windows are leaky is the typical conclusion. Operable windows have several parts that all work together for peak performance. If one thing is slightly off track, the rest of the system can suffer.
Watch: Window Installation Steps
Watch: Air Sealing Windows
Drafty Window Solutions: What will actually work?
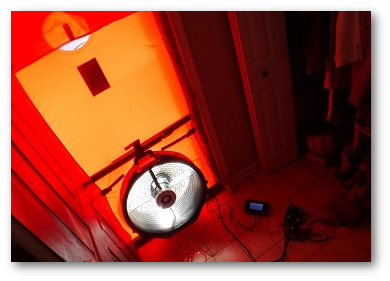
Get a Comprehensive Home Energy Audit
A great way to deal with the issue of drafty new windows is to have a comprehensive home energy audit performed.
An energy audit includes a blower door test so you can find the sources of your drafts.
A great energy auditor will guide you to better comfort with knowledge and diagnostic tools.
If you decide not to have an audit then you can sign up for this blog or read this article about the unobvious ways in which your home is inefficient.
________________
I would like to hear your comments about this article. Feel free to post something below...
________________
Written by Eric Gans
I have over 1000 energy audits under my belt in Maryland. I like to take my personal experiences with each of my audit customers and try to get the things that concern them out into the world so others can make good home improvement decisions - in the right order - according to their needs.
________________
If your house is cold there are likely several reasons for the problem.
The reason most think their home is cold: windows, doors and HVAC.
But, if you really want a more comfortable and energy efficient home then the places you really want to look are not where you might think.
Take it from an energy auditor with over 1000 energy audits and blower door tests completed - these are the things that will actually give you the very best return on investment.
More Focus on HVAC Ducts Rather than Replacement
Every homeoewner should familiarize themselves with their HVAC duct system. A disconnected duct can not only cause a room to be cold, but it can disrupt temperatures throughout your entire home.
Air Pressure
If you stop and think about it, so many things in our lives are working for us because of air pressure. For example, tires. Air pressure inflates the tire so that driving, riding, mowing etc. can happen with good performance and comfort. No air - no good!
Inside our homes, air pressure is used in a variety of ways. One example is plumbing. What happens when too many people try to take a shower at one time? The air pressure drops with so many open taps so the overall pressure of the water decreases as a result.
Air Pressure and Comfort
Air pressure is also used to heat and cool our homes. If you have air ducts, there is a whole lot happening inside the duct system each and every time the unit is running.
The ducts are the primary mode of transportation for the warm air to flow and service the rooms it was mathematically sized to do.
In an HVAC system that uses air ducts the blower pushes the air through at a specific velocity or flow. The size of the ducts relies on the force of the blower to get the air to where it needs to go.
So, similar to a train arriving to an place where the track has been removed and not being able to get any further - if there is a disruption to a portion of the duct system - the air will not get to where it needs to go.
Ducts in Attics and Crawl Spaces
Although it is entirely possible, it is highly unlikely that the rigid ducts that run through your walls and inside the "envelope" of your home are or ever will be disconnected. As an example, the ducts in the unfinished part of your basement (inside envelope) have likely been there since the beginning and they have not collapsed under their own weight!
The ducts that give the most problems are those that are in the attic or crawl space. The two main things that I see that contribute to the issue ar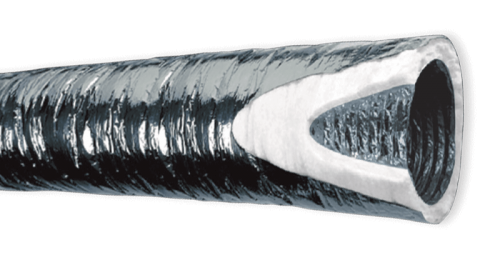 e:
e:
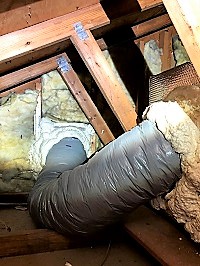
1. The use of flexible ducts that branch off of the main supply plenum are much less forgiving when moved, bumped or subjected to some of the harsh temperatures in an attic.
2. Poor workmanship likely due to the pure simple fact that working in an attic or crawl space is not pleasant and it is human nature to want to get the job done and get the heck out!
Disconnected Ducts or Poorly Sealed Ducts
When you happen to be walking around in a part of your home that has an attic above you - look up. If you have air vent supply registers in the ceiling then the chances are very high that you have HVAC ducts in an attic space.
The next questions you should be thinking if you do have vents in the ceiling is when is the last time you went to the attic and had the ducts inspected?
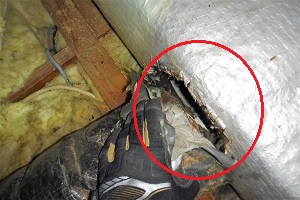
This attic inspection during a home energy audit in Maryland demonstrates the importance of having attic and crawl space ducts routinely inspected.
Why Does it Go Unnoticed?
The first idea that comes to most people's minds when a room in the house is not quite as comfortable as other areas or rooms is that the windows are bad.
In fact, it is not uncommon to do a home energy audit for a mechanical engineer that knows pretty much everything there is to know about an HVAC system, but they did not realize that the duct above their head might be the reason that they are having a comfort issue, rather than need to dense pack insulate a finished southern facing exterior wall.
The Impacts a Loose or Disconnected Duct Can Have
If a duct is disconnected it is not delivering the air to the location that it is supposed to. Obviously, that particular location suffers.
Due to static pressure, the entire duct system is effected when one duct is disconnected or if all ducts are very loose! When the pressure inside your duct system is radically changed, with a disconnected duct as one example, it can cause temperature variances in other parts of the house.
What Can You Do?
The best thing to do is take advantage of any home assessment program in your state that includes the technician going into your attic or crawl space as part of the inspection process.
For example, in Maryland a BGE or Pepco customer (power utilities) can get a comprehensive home energy audit for $100 which includes a detailed inspection of the entire thermal envelope of the home. As part of the energy audit, HVAC ducts are assessed and testing can also be done, if necessary, to determine how leaky the ducts are when the system is running.
If You are Cold Always Think Attic and Basement First
One lesser known place compared to windows and doors to get air leakage sealing done and earn big savings is at the attic floor and in the basement. Because heat rises and other pressure dynamics inside of your home, most of a the warm air leaves through the ceiling and into the attic (outside). And, most of the cold air infiltration occurs in the basement or at the foundation level.
Basement Rim Joist Air Sealing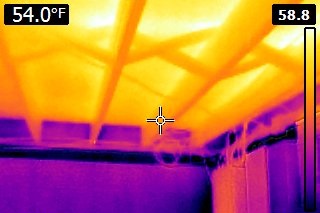
Simple sealing and insulation can go a long way in the right places in a basement. Often times the first instinct is to insulate the walls of the basement. But, the rim joist is much leakier and will yield much bigger gains when treated - for much less cost.
If you are not familiar with the rim joist in your basement, take a look at the walkthrough video below.
If you have an unfinished area of your basement look at the top of the foundation wall for the rim joist area. Here is a tip: if you see spider webs dangling around then chances are you have air leakage in the general vicinity.
How Does My Basement Leak Cold Air?
A good way to understand why a basement or lower point in a home is more likely to leak cold air is to think about the Empire State Building. Whether you have been there or not, you might recognize that any larger building has some type of a revolving door at the entrance. In many cases, buildings have a double door solution where you open a door walk five steps and then open another door.
The reason for these solutions is because of pressure due to the stack effect or chimney effect. On certain days, the door might not be able to be opened or could blow off due to pressure dynamics inside and outside of the building.
Stack Effect
The stack effect can be simply understood by thinking about a wood burning fireplace. When the fire is going, the smoke and heat rises up and out at the top. That is a positive pressure dynamic. At the base of the fire, the fire is "sucking" up oxygen - the negative pressure.
In a building, the dynamics are similar. The warm air rises and escapes through cracks and crevices creating a positive pressure dynamic - similar to the stack effect. Downstairs, in the basement, where there are cracks and crevices, particularly at the rim joist, cold air is drawn or "sucked" in.
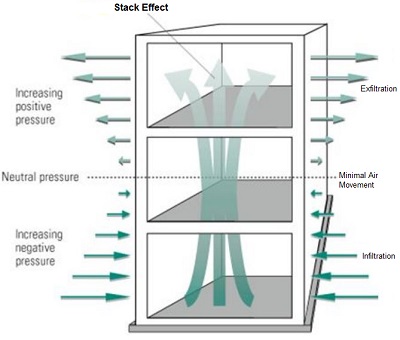
For this reason we will recommend to air seal the attic floor and the basement rim joist every day all day over windows and doors. If you follow the science and try this out in your own house on a clear, dry mid range temperature day. Open the upstairs windows and watch the curtains get sucked against the screen wanting to flow out and open a first floor or basement window and watch curtains flap towards the inside from the air being drawn in.
Conclusion
If your home is perpetually cold then take note of where your HVAC ducts traverse through your "building's shell" and where perhaps there could be room for issue or improvement. Delivery of the air is equally important to the creation of the air. And, everyone must pay close attention to the details of their attic floor. Creating a continuous air-barrier (not to allow any air to pass through) is critical to a comfortable and energy efficient home.
I would like to hear your comments about this article. Feel free to post something below...
How do I Know this Stuff?
If you are interested in figuring out how much attic insulation costs, there might not be any better way than to look at a project than through the eyes of a certified home energy auditor - such as myself.
I set out into Maryland communities every day to perform comprehensive home energy audits for BGE and Pepco utility energy customers by inspecting their attics, crawl spaces, and basements and then providing them with solutions, insulation costs, and returns on their potential investments.
Each home energy audit requires that a specific set of data points for the house get collected. During that process, it is an auditor's job to determine what "opportunities" exist for low-cost insulation improvements, also known as retrofits.
Retrofitting is the work that goes into Home Performance.
You will find loose fill insulation, spray foam in different varieties, fiberglass insulation, rigid foam board, caulk, baffles and attic domes if you visited a home performance project while in progress.
Making a real impact on your comfort and overall energy efficiency is the goal of the comprehensive home energy assessment and the subsequent retrofitting.
Home Performance vs. Attic Insulation
In addition to the bottom line cost of attic insulation, another thing you must consider is the two different ways you can go about getting insulation pricing and how they differ. You don't want to miss key techniques that make a big difference in your final results.
1. Typical Insulation Quote
Most people tend to get an insulation cost estimate the familiar way which is to call ABC Insulation Company and have a rep come out, take a look in the attic, and give them a price.
After all, it is only insulation and it is in the attic. How hard can it really be?
2. Home Performance: Comprehensive Energy Audit
An energy audit has a primary goal: to evaluate your home as a complete system and report back to you. The energy audit is actually an assessment and it uses a whole-house approach to calculate energy usage deficiencies and find ways to make everything work much, much better. And, it comes with measurable results.
Much like the performance of your car increases with a tune-up, your home can perform better after tightening things up! This means that you are able to sit in the driver's seat when it comes to creating better comfort and efficiency.
Another key benefit of getting the audit done is knowing that all of the possible insulation costs will be uncovered in advance for accurate pricing and budgeting. -Top-
Think About Home Insulation in Three-Dimensional Ways
Common Insulation Misperceptions
Most homeowners think that the more insulation you have the more efficient you are and the more comfortable you will be.
Others believe that insulation is missing in their walls and it is the reason why bills are high and comfort is low.
But, if you miss the opportunity to insulate your home correctly, then it could leave you scratching your head about why it is not more comfortable in the house and why the energy bill has not gone down.
What does it mean to insulate effectively?
Establish a Pressure & Thermal Boundary
If you have had a typical insulation quote recently and the representative did not mention the pressure and thermal boundary then you might be on a path to an incorrectly installed insulation project.
Most insulation, alone, will not stop the flow of air.
Insulation is similar to a jacket. If a jacket is not zipped, the air flows inside and around the shell resulting in loss of body heat and comfort woes.
If insulation (thermal boundary) has nothing stopping the flow of air (pressure boundary), then your home loses energy and you feel drafts.
Building Envelope
Identifying your house's envelope or "shell" is important for a properly estimated and installed insulation project.
Knowing where insulation is needed at every turn and what type of insulation is best for the job is an energy auditor's assignment.
Pressure dynamics inside your house create infiltration (air coming in) and exfiltration (air going out) in places that will get missed if building science principles are not applied during a typical insulation quote.
Incorrect Diagnosis
A typical insulation quote may provide information about insulation for walls which is costly and will undoubtedly yield little to no meaningful results.
An energy audit is a great way to gain a new perspective on how your home is actually losing energy and why the top and bottom are way more important than the sides.
Testing
Did you know that a properly installed insulation project around the house is likely to yield measurable results compared to window and door projects that tend to cost more?
For starters, an energy audit will perform an air leakage test (blower door test) and each window and door can be checked.
The blower door test is not something you would get with a typical insulation quote.
The test can show how ceilings, walls, floors, and basement areas all lead to as much as 40% of a home's air leakage compared to only 10% for windows and doors. -Top-
The Attic Insulation Technician - Required Skills
Determining how much attic insulation costs also will depend on the solution's complexity. Each home is quite different and getting measurable results requires hiring skilled technicians that are properly trained on how to do the job right.
Sealing and insulating a building shell requires technicians to work in tight spaces. Crews must be in good physical condition.
Watch this skilled technician install a baffle at the attic low point.
Often times similar houses in the same development have different problems. Through the years, different owners make changes to the building shell. Each property owner had their own "vision" along the way.
X-Ray Vision
For the best results, technicians must have good general knowledge of residential building construction, including basic knowledge about the techniques that are used when building additions.
The insulation crew needs to be able to look past the boundaries that the eye can see so that sealing the right spots or not sealing the right spots is constantly being considered.
Otherwise, important measures required to make the job effective, may not get completed.
The quality of the workmanship should and does factor into the cost of an attic insulation job. -Top-
Proper Measurements Are Key to Attic Insulation Cost
Houses that need pricing for attic insulation usually have lots of twists and turns. This is not because the insulation is different or because the house is older, rather it is a simple fact that all houses are complicated.
Knowing how to evaluate things from all six sides when determining the proper treatment is key to accurate insulation pricing.
Missing a measurement or a location where insulation is required could be the difference between not only an accurately priced job but also a job that will yield the desired results.
Similarly, if you don't seal all of the holes in a leaky boat then you might as well not seal any cause you're still gonna sink!
A detailed work scope should be provided with specific information about the area/measurements and treatment methods. -Top-
The Size and Style of Home Impacts Insulation Cost
In all cases, insulation around a home must be contiguous with an air barrier. That is that the insulation and the air barrier must be together wherever the boundary between inside and outside exists.
When considering how much attic insulation costs, it should be understood that the price depends on the style and size of the home.
If a home has high ceilings in a bedroom and a standard ceiling in the hallway, there could be higher costs. This configuration creates a knee wall that also needs insulation.
If a house has a crawl space foundation and also has high ceilings on the upper floors, then the cost will be higher than a home that does not have those features.
A good general way to figure out the cost comparison of two insulation jobs is to determine the overall square footage of the home's envelope or building shell.-Top-
What are the Costs of Having Existing Insulation Removed?
 In most home renovation projects it is customary to get rid of the old. For example, during a replacement roofing project, the old shingles are stripped off the roof and thrown into a dumpster not to be used again. The old shingles have no value. In fact, adding shingles over top of old shingles will actually lower the value of the project and the overall value of the home.
Insulation, on the other hand, is different. The insulation in your attic, believe it or not, does have some value. For example, if you have 10 inches of fiberglass rolled batting insulation on your attic floor, the R-Value is calculated at 10 inches by a factor of 2.1 to get the R-Value of the material. So, in essence, the insulation is giving you back some insulating qualities.
Unfortunately, as in the scenario above, there is typically not enough insulation to adequately separate the living space from the outside. But, there is no reason to get rid of the value that you do have. For example, if the R-Value of your existing insulation is calculated at R-20 and the recommended value should be R-49, then you only need R-29 to get where you need to be.
Removing existing insulation actually gets you further away from the mark you need to hit and will end up costing you more.
Here is one key thing to always remember: there is virtually no reason to remove existing insulation on the attic floor. Insulation is on the "outside" of your home.
Insulation that has been subjected to mold growth will not be a threat to your health if the issue causing the mold growth is stopped. Therefore, throwing away insulation that has mold on it once the problem is resolved is a waste of resources.
Once you stop a moisture issue in an attic that is leading to mold, it is not necessary to remove the dirty insulation.-Top-
Solutions: Insulation Cost Analysis
**Pricing listed in this article is based on information gathered in the Maryland market.
There is an expression in team sports like football and basketball. It goes something like this: "Let's take what the defense is giving us". Essentially, what the team is saying is let's go after the places that the other team is not guarding. The path of least resistance, so to speak.
In preexisting homes, it is a similar game plan. We have to "take what the house is giving us". This means that careful consideration should be given to treating the areas that are accessible compared to the areas that cannot be reached. This approach will have a significant impact on the overall cost.
As a general rule, when you are dealing with a Home Performance contractor, the overall goal is to find the opportunities that:
SAVE YOU THE MOST and COST YOU THE LEAST!
Watch to Get More Insight Into Attic Issues
Insulation Costs
Let's take a look at what items are on the retrofit list and figure out a little more about each type of project including what is involved with treatment and how much each insulation solution costs.
Cost for Rim Joist Air Sealing & Insulation
$5.25 per linear foot
Air Seal and Insulate Rim Joist - The cost of an attic insulation job should also include easy-to-access areas in the basement or at the foundation area. Great opportunities to seal the basement exist at the top of the foundation wall. Basement work in tandem with attic work will yield the best overall results.
-Top-
Watch before and after treatment to the basement rim and band joist.
Knee Walls Insulation Cost and Treatment Methods
$4.25 per square foot
General Knee Wall Insulation with Air Barrier - Generally, a knee wall is much like an exterior wall. The difference - it is accessible from an attic area. Knee walls are usually insulated, but not well, and as a result, they are major sources of energy loss and comfort complaints. To properly "button" up a knee wall, you can expect to pay for air sealing, new insulation, and some type of air barrier (sheathing).
$3.50 per linear foot
Block & Seal Knee Wall Attic Floor Gaps - A big issue that many homeowners don't address is the space between floors. The space between the floors is only accessible if certain types of residential home construction.
-Top-
Check out a knee wall issue and how it gets treated.
Attic Access Costs & Solution Types
From $175 up to $300 per opening
Most homes have at least one way to get to an attic space that needs to be sealed. The best way to determine how many hatches you have is to count. Then for each one, consider where you access the space. If you are inside, then you need to seal the opening to disconnect it from the attic. Attic access can range in price depending on the size, type, and location.
The most commonly seen attic access points are push-up hatches and pull-down stairs.
Watch a technician treat an attic hatch in the field.
Attic Air Sealing Costs
Air sealing an attic can be broken down into two main parts.
$1.00 per square foot
1. General Air Sealing: includes the top plates, standard penetrations (regular light fixtures, plumbing stacks, and general voids and cracks.
-Top-
Watch a technician air seal connections between the attic and inside.
From $50 - $200
2. Ala Carte Air Sealing:
A. Combustion appliance flues
B. HVAC chase openings
C. Staircase voids and other thermal bypasses that are created by the construction style of the home.
D. Vertical wall air sealing
E. Recessed Lights
F. Chimneys
G. Plumbing Penetrations
Cost per air sealing solution can range depending on the requirements to properly seal the area.
Attic Insulation Cost
A key to determining the cost of insulation for your home is to figure out what the current R-value is in the attic and around the shell of the home. You can use this article to determine your exact R-value and come back to see what the cost is per square foot for the R-value you are missing.
Insulation Price Matrix - Blown In Insulation Solution
$ Per Square Foot
R-13.......$.98
R-19.......$1.35
R-21.......$1.57
R-30......$2.07
R-38......$2.43
R-49.......$3.07
R-60.......$3.77
Watch loose fill insulation being installed.
Baffle Installation Pricing
$4.00 Each
Attic ventilation is important for the longevity of your roof, roof deck, insulation, and wood framing. You should expect that for every foot of eave, you have around your house that you will need 1/2 a baffle to improve, maintain or in some cases actually create new air intake for ventilation. Baffles are installed in the toughest-to-reach places in the attic - the lowest place the roof deck is in relation to the attic floor. -Top-
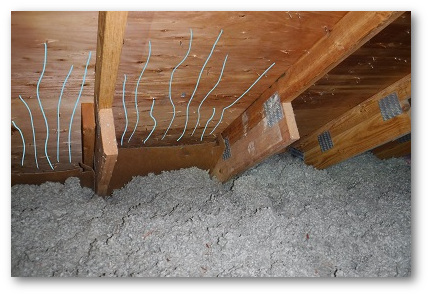
Baffles maintain a channel for air intake and good attic ventilation.
Cantilever (Overhang) Insulation Costs
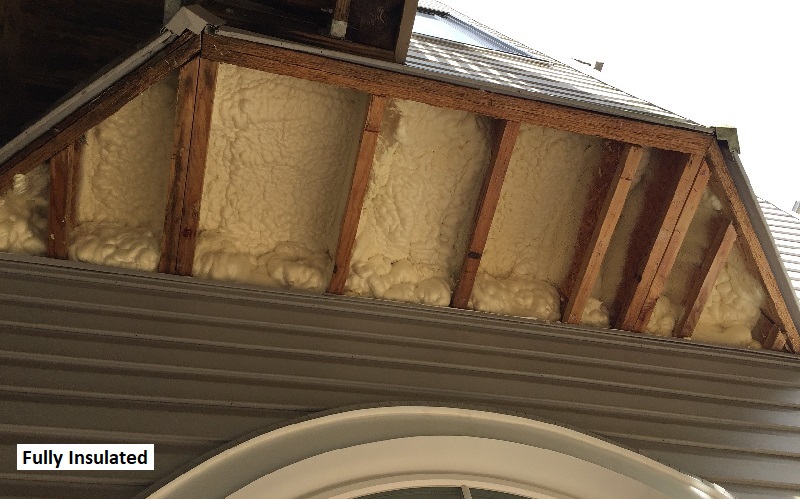
Overhangs on the front and rear of your home are wonderful because they add valuable square footage to the inside of the living space it can really make a difference. The problem, they are susceptible to air infiltration if not insulated properly and they are hard to get to.
Pricing for a cantilever can vary depending on many challenges, including the height at which the cantilever is positioned, the type of siding, if any, is in place and the amount of insulation required to fill the cavity.
You can expect a cantilever project to cost between $275 - $2000 and more. Analysis should be given to the value vs. cost for a cantilever project. A well-trained energy auditor can give you guidance on this type of insulation solution and the cost.
Tip: Once you identify the location of any first-floor cantilever you have, take a look to see how that aligns with any unfinished portion of the basement. If the two areas match up then the overall cost can be less since the need to remove the soffit is not necessary.
Watch spray foam being applied to this overhang with ducts.
-Top-
Cost of Crawl Space Insulation/ Encapsulation
A crawl space foundation creates great opportunities for improved efficiency, comfort, and indoor air quality. On the other hand, it can escalate the overall cost of an insulation project.
Untreated crawl spaces tend to go unnoticed when homeowners are thinking about how much an attic insulation project costs, but not considering the space for treatment could be the difference between an attic insulation job that yields results and one that does not.
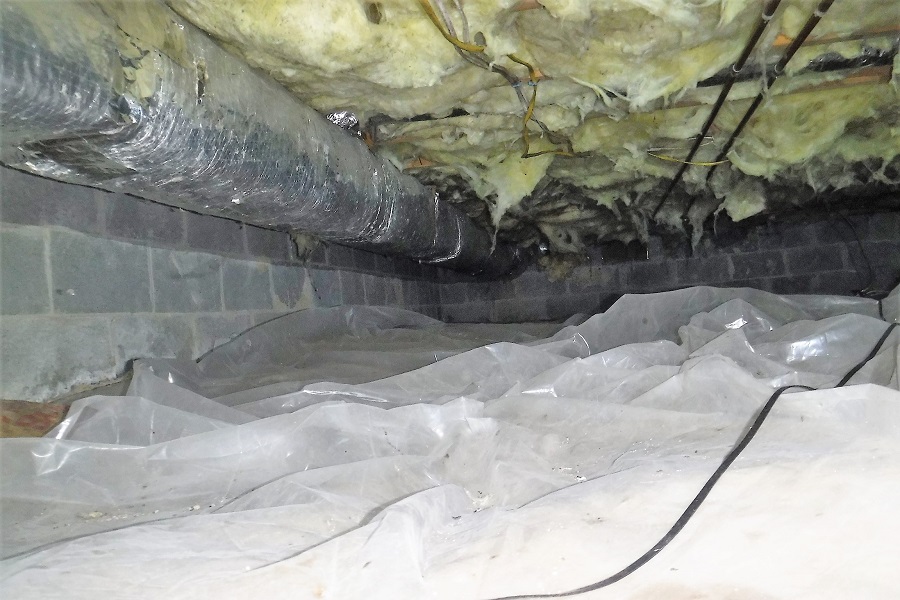
Crawl Space Before
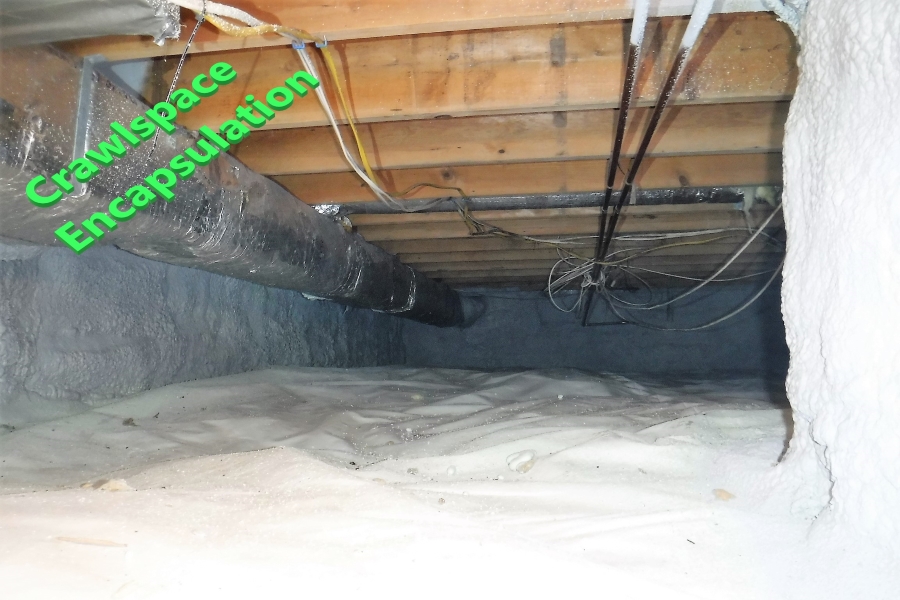
Crawl Space After
Crawl spaces have to be broken down into the following components of the job:
Typical Crawl Space Work Scope and Insulation Cost
Removal of Existing Insulation - $2.00 per sq. ft.
Floor/Vapor Barrier - $1.50 per sq. ft.
Walls (R-13) - $6.00 per sq. ft.
Closed Cell Spray Foam - $12.00 per sq. ft. (includes ignition barrier)
Rim Joist $5.25 per linear foot
Duct Sealing $2.50 per linear foot
Any Access Points - $175 - $300 each
Dense Pack Insulation Cost and Solutions
Hometrust will recommend dense-pack insulation solutions for easily accessible cavities that can be properly "packed" to get the desired result. Dense packing walls are a project that should be given a lot of consideration by any homeowner in any age home.
Pitfalls associated with improper installation techniques could render the work useless, however, you may never really know.
The cost to dense pack a cavity is $6.00 per sq. ft.
To understand more about why sealing the top and bottom of a home are most beneficial, read this information about building science.
________________

Written by Eric Gans
I have over 1000 energy audits under my belt in Maryland and each scenario requires an insulation cost analysis. I am certified through the Building Performance Institute.
I would like to hear your comments about this article. Feel free to post something below...
Sealing HVAC ducts is an easy way to save energy and improve comfort and it can easily be done with a few supplies and a little bit of time and effort.


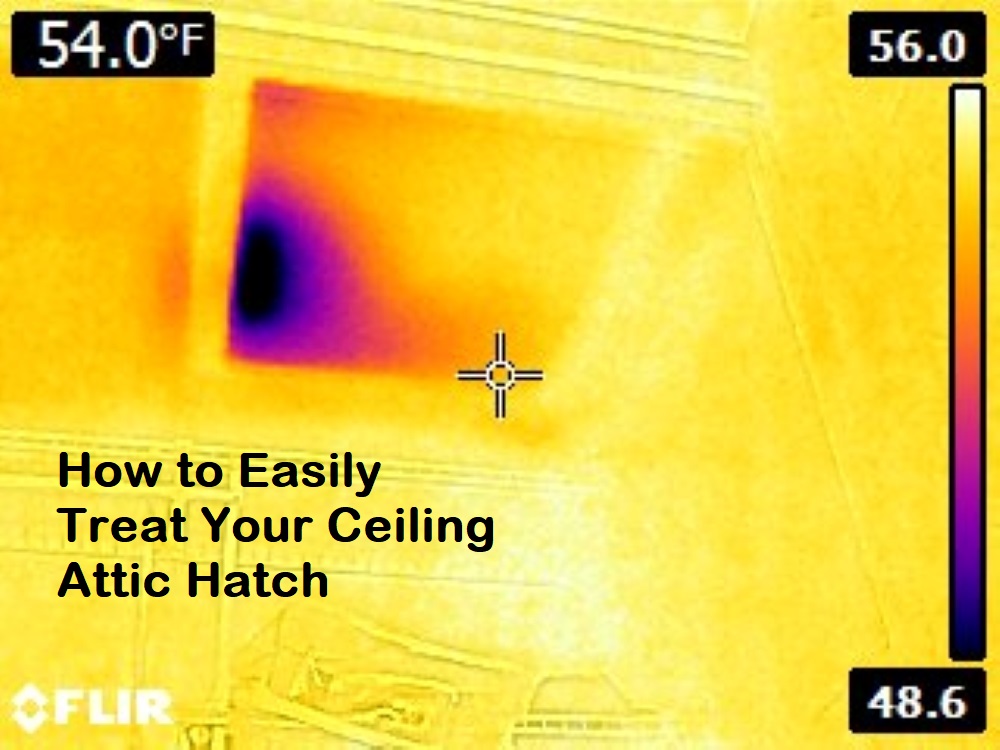
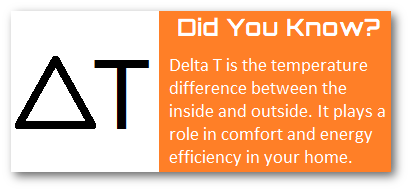 The pressure inside a home is greatest at the top of the building and the bottom of the building so looking in those two places will yield the lowest hanging fruit.